
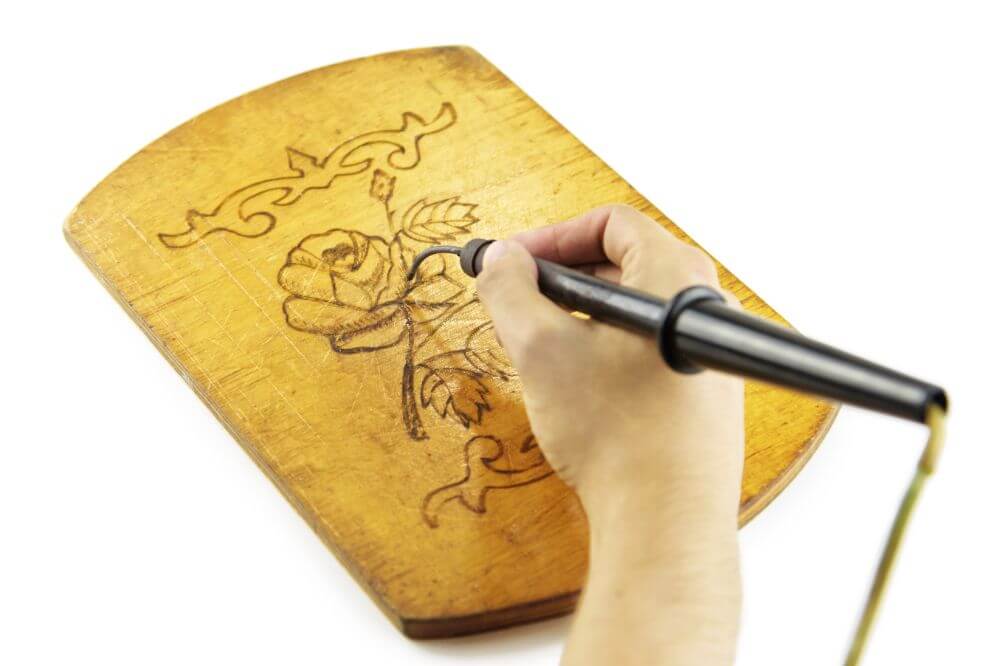
Wood burning also referred to as pyrography, uses a hot element to create designs on wood. If you enjoy such DIY projects, one of the tools that need to be in your collection is the soldering iron.
However, how effective is this tool at burning wood? This is a question many DIY enthusiasts ask themselves, and if you also are in such a predicament, you’re in luck.

This detailed article guides you on the steps to follow when burning wood with your soldering iron. As a result, you’ll be able to perfect your pyrography skills thanks to this useful and handy tool.
Therefore, if you wish to refine your skills on how to best use the soldering iron for creating a burning wood art, here are the tips you should observe.
How Effective Is The Soldering Iron Burning Wood?
Whereas the soldering iron isn’t recommended for burning wood, you can still use it for such operations. However, the tips of soldering irons aren’t as pointed those of wood-burning tips and are made from either iron or copper. Because of this, these tips not only restrict you on the quality of work achieved but also get destroyed a lot faster.
If these setbacks aren’t holding you back on your quest to use the soldering iron to burn wood, here is are useful tips to observe before starting this exercise.
Locate The Sharpest Tip
Soldering irons usually incorporate interchangeable tips, just like pyrography pens. With these pointy and sharp interchangeable soldering tips, you’ll be able to achieve a wider range of effects. Furthermore, it provides you with greater control, thereby ensuring all your tasks of remarkable quality.
Ensure The Iron is Well Heated
Different soldering irons heat up to different temperature levels. Therefore, if your soldering iron is low wattage, you should give it extra time to create any noticeable markings. You should opt for something more suited to this task if you don’t have to wait for the soldering iron to heat up.
Regularly Clean The Iron Tip
The tips wood-burning pens are made from nichrome, which differs from that of soldering irons. Because of this, wood and ash materials easily accumulate on the iron tip a lot faster, thereby reducing its effectiveness at burning wood. You should avoid this by cleaning your soldering iron’s tip regularly using a steel brush and achieve greater efficiency.
Try Out Your Technique On Scrap Wood
When burning wood using your soldering iron, you don’t enough control meaning it will more challenging to achieve the desired shape of the lines. Thus, it’s advisable to first test your skills on a scrap of wood before proceeding to your project.
Change The Tips When Soldering
When using your soldering iron for your pyrography project, you’ll need to change the tips as you continue with the soldering. This is crucial because the tip gets oxidized over time, and its efficiency at wetting the solder is reduced.
By following these steps, you’ll now be ready to start your pyrography project.
Steps To Follow When Using Your Soldering Iron To Burn Wood
If you want to ensure the best possible quality of your work, here are the steps to follow when using a soldering iron to burn wood.
Step 1: Get Your Materials
There are several materials you need to successfully complete your pyrography project including:
- Graphite paper
- Pencil
- Soldering iron
- Wood
- Pattern
Step 2: Transfer The Pattern Onto Wood
Place the graphite paper on wood to transfer the design and using a pencil or pen to trace the whole pattern. When you draw on the paper, graphite gets transferred from the paper onto the wood surface.
Step 3: Fire Up and Test The Soldering Iron
Before you can start your wood burning project, it’s important to test how hot the soldering iron has become. By doing this, you’ll be able to avoid a possible scenario where the wood might start burning because of too much heat. As you wait for the soldering iron to heat up, you should ideally clamp it to a vise to ensure it’s firmly held in position and avoid a possible fire outbreak.
Ideally, it would be best if you opted for an extremely low setting of 35W as this provides you with the perfect balance between making even burns and causing too much stroke. If you stick to this heat level, it’ll be possible to make dark lines that don’t have a lot of spill-over due to heating wood on its sides.
Step 4: Burn The Wood
Now you’ve got to the part that entails the burning of wood. While doing this, you need to maintain great caution, and it requires you to put on your artistic hat. This is quite crucial because once you’ve made a mistake, it can’t be undone. Therefore, you should make sure to do enough practice before attempting to start burning the wood for a quality finish.
The best way to avoid a possible scenario is by burning the wood slowly and steadily. As you do this, it’s advisable to do short sections at a time, especially when using your soldering iron to burn the trickier bits. You should also confirm that your soldering iron doesn’t heat up too much since it might burn you.
Step 5: Do The Finishing Touches
Once you’re done burning the wood, the next thing is ensuring the final project looks neat and tidy. This entails erasing any pencil marks and guidelines which didn’t get burned over. The ideal material to use when doing this would be varnish or stain because it makes the wood look a lot better.
Conclusion
Wood burning is a fun and interesting project that you can do during your free time. However, if you often found completing these tasks quite challenging, this won’t be the case after reading this in-depth article. With the steps to follow during your pyrography project and tips to observe in mind, you can now confidently start on such a project knowing the finished item will be of exceptional quality.
