
Drill bits come in handy as they help you make spiral and long chips plus can effectively drill a hole within a short duration. Therefore, what should you do if you notice your drill bits have become dull?
Well, you should not worry since, in this article, you will be taken through how you can sharpen a drill bit using a bench grinder. Consequently, you will experience little to no strain when using it due to the sharp ends as well as improved results. Therefore, here are the simple steps you need to implement when to sharpen the drill bits with a bench grinder properly.
Step 1: Make preparations
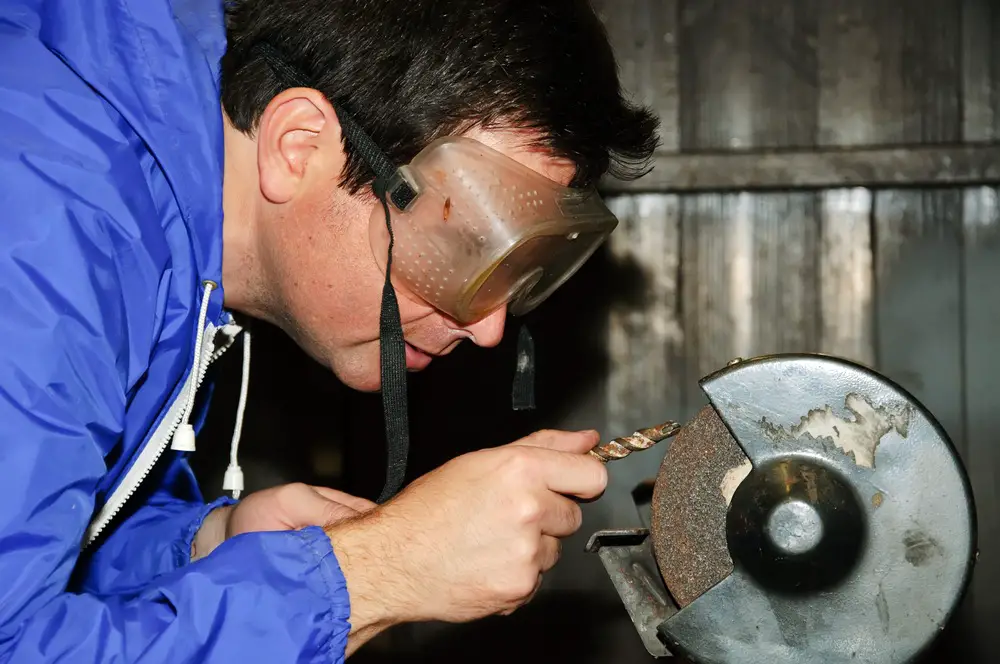
Before you even start sharpening the drill bits, you first need to carry out proper preparations because sharpening these items results in the flying of metal in the air. Thus, it is wise to put in place safety measures to guarantee your wellbeing by wearing leather gloves to shield your hands and goggles to safeguard your eyes.
For You: Bench Grinders Recommended for You
Furthermore, you can also decide to make use of pliers, vise, or sharpening jig to keep your hands far from the bench grinder or firmly hold the drill bit in place. With the help of these tools, you will not struggle when using the grinder as you will be able to easily operate the grinder since the drill bit will be in a suitable position during this entire process.
Step 2: Examine your drill bit
Once you have prepared yourself, you should examine the bit as you will need to get rid of a little bit of metal from it for it to become sharp again. Usually, most bench grinders feature two kinds of wheels; that is, one is coarse, whereas the other one is soft. When drilling a bit that is extremely blunt, you should first use the coarse wheel and subsequently make use of the soft one in the processes that follow.
Step 3: Switch on the bench grinder
Now with everything in place, turn on the grinder and then tightly grip its cutting edge, making sure it is parallel to the wheel. Consequently, slowly and cautiously move the drill bit until it comes in contact with the wheel. Additionally, make sure the remains straight at all times and hold its original tip at a 60-degree angle without rotating or turning it.
Step 4: Hold the bit in the same position
You should continue holding the drill bit in the same 60-degree angle for about four to five seconds as your objective is grinding its weak surface rather than wearing it down. Therefore, put your entire attention on grinding the bit at positions where the tip comes into contact with the twisted shaft to form the ideal angle. It is vital to take note that the sharper the angle, the sharper your drill bit will become.
Step 5: Take pauses
Take pauses after sharpening your drill bit for about four to five seconds and then placing it inside a container that has ice-cold water to allow the cooling down of metal. Failure to follow this step makes your drill bit extremely hot, and this can subsequently cause it to wear down faster hence shortening its lifespan. Once the drill bit has cooled enough, touch it to confirm whether it has been appropriately sharpened or if it still needs some work done.
Step 6: Repeat the grinding process
If the sharpness of your bit’s sharp side has satisfied you, you should turn it 180 degrees and then repeat the grinding and cooling process for the opposite side. Try and aim for the 60-degree angle as well as the point and angle that has an identical width on both sides of the drill bit as this will allow it to clear holes and bore in a straight line.
Furthermore, you can sharpen both sides of the bit to ensure uniform sharpness, and you can achieve this by holding it on your strongest hand and then flip it 180 degrees once you have sharpened it for a couple of seconds.
Step 7: Test your drill bit
Once the tip of your drill bit’s tip has been smoothly honed and has sharp edges at a similar width, test it out to see how it performs.
You should do this by holding the drill bit on a scrap wood piece and then twisting it using your hand. If you hold the bit properly, it will make a hole regardless of the pressure placed, and if it does not, recheck its tip and then use the grinder to make it sharper.
While doing this, try and achieve the 60-degree slope on all the sides of the drill bit. You must never be dismayed by having to repeat the grinding process numerous times as you learn from experience.
Suggested: Great Bench Grinders for Woodworkers
Step 8: Insert the bit in your drill
After you are confident that the drill bit has achieved the desired sharpness, put it inside your drill, and then start drilling the same wood scrap. If you have sharpened the bit properly, it will hit the wood with minimal pressure and within no time. Subsequently, when you take off the drill bit from the scarp of wood, it will fling wood chips as it emerges.
Conclusion
The sharpness of the drill bit is essential if you want to have an easy time as you carry out your woodworking duties. Therefore, you need always to ensure your bits are sharp to achieve optimal results as well as to make your work easier.
Thankfully, having read through this article, you now have an idea of the steps you need to take when sharpening your drill bit; hence, you never will need to buy a new one every time it becomes blunt regularly. However, you need to take caution when grinding the bit to avoid overheating it, as this can shorten its lifespan.
Additionally, you should not feel discouraged if you regularly need to repeat the grinding process before the bit becomes sharp enough. If you observe everything discussed in this article, you will never have an issue using your drill bit.