There is no doubt that measuring acceleration is highly essential when it comes to carrying out several interesting projects. Usually, in an embedded system, this task is often carried out by an accelerometer.
In addition to giving you the speed of an object, an accelerometer works as an indicator as well when a natural event such as tilt or fall occurs.
Therefore, interfacing an accelerometer with Arduino is highly essential. The whole process is relatively easy; by going through this article, you will be able to master the entire process with the utmost ease.
In this article, we shall be discussing how to interface the accelerometer with Arduino. We shall be using the ADXL335 accelerometer for better understanding.
Introduction to ADXL335
The ADXL335 is an accelerometer-equipped with a triple-axis. This means that the ADXL335 is capable of measuring acceleration along three axes, which are the x, y, and z. Usually, the value measured will appear as a voltage change at three output pins with respect to common ground.
Acceleration is measured by the sensor using a layer of polysilicon that is suspended above a silicon wafer. This has been made possible by the polysilicon springs. The mass’s motion is translated into the movement of plates of different capacitors hence offering an output that is proportional to acceleration.
Interfacing accelerometer with Arduino
When interfacing the ADXL335 with Arduino, you will require the following:
- USB cable
- Connecting wires 9(ensure that they are not very short)
- Arduino (You can use any Arduino that best suits your needs)
- ADXL335
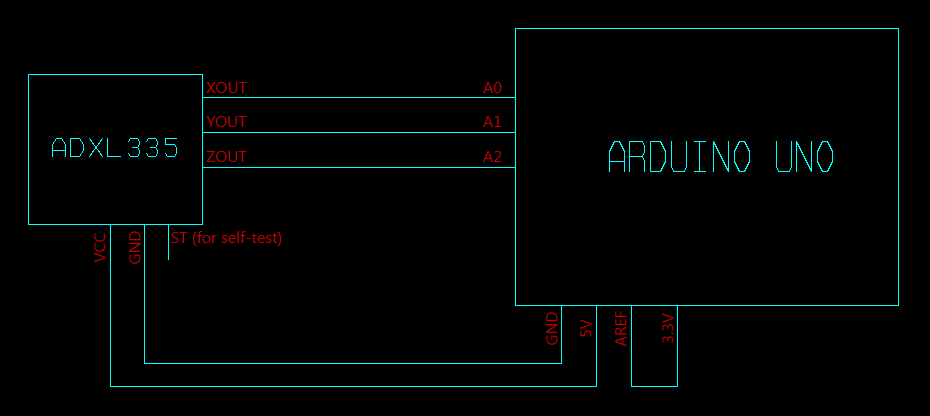
With that in place, you can commence on interfacing your ADXL335 with an Arduino. The first thing you will have to do is connect each pin. The ADXL335 is equipped with three output pins that give analog outputs. These pins have to be connected to analog inputs pins of an Arduino.
It would be best if you connected your accelerometer’s VCC pin to the 5-volt pin of your Arduino. Once that is done, you will go ahead and connect your accelerometer’s GND to the GND of your Arduino. When you are done, you will set the ADC reference voltage as 3.3 volts; you should as well connect the AREF pin to the 3.3 volts allowing it to match with ADL335 output.
Connect the components! 🙂

When that is done, you will go ahead and wire your program. There is no doubt that programming an Arduino is relatively easy and straightforward. The programming process involves only three steps. The first step is initializing the variables.
Once that is done, you will go ahead and call any function that will initialize any process. It will end up being executed once. The final step is to call the functions that will perform the task on your project. Usually, they are provided in an infinite loop allowing it to be executed over and over again.
To initiate the variables, you will require three variables for inputs. You can name them as you wish, for instance, “aout,” “bout,” and “cout.” Once that is done, you will proceed and assign your values to the analog input of your Arduino to these pins.
Const int aout = A0;
Const int bout = A1;
Const int cout= A2;
Go ahead and assign three different output variables allowing you to display your values at your analog input pins on a serial monitor. You might as well consider using three more variables if you would like to scale the value to your liking.
You will then initialize serial communication. Once that is done, the absolute function argument is your Baud rate. When it comes to the loop, you should first read the analog values with the use of analogread() function. As you read the values, the ADC of an Arduino operating under the hood will help in converting the values into a digital format.
You will go ahead and upload the code, and to do this, you will connect the Arduino to the PC using a USB connector. Once connected, you will select the upload button available at the top of your Arduino IDE for Windows. Proceed and choose the serial monitor icon present at the top right corner. Once that is done, you will be able to see your accelerometer readings. These readings are vital, and you can always use them in your project.

How does the accelerometer work?
Ever wondered how your smartphone knows up from down. This is one of the coolest features equipped in smartphones. This has been made possible by an accelerometer.
An accelerometer is highly essential; they help in showing direction on a smartphone’s compass along with other great abilities. So you might be wondering how they achieve this. Well, the accelerometer looks like a simple circuit and is used in almost all electronic devices.
Despite having a humble appearance, the accelerometer is equipped with several parts and works in various ways. Two ways in which the accelerometer works are piezoelectric effect and capacitance sensor.
Usually, the piezoelectric effect is considered the most common form of an accelerometer, and it tends to use microscopic crystal structures, which becomes stressed as a result of accelerative forces. The crystals help create a voltage from stress; hence an accelerometer will interpret voltage to determine orientation and velocity.
On the other hand, capacitance accelerometer sense works through a change in capacitance that is between microstructures that are located next to your device. When the accelerative force makes one of the structures move, the capacitance will end up changing, and your accelerometer will end up translating capacitance to the voltage for interpretation.
Final Thoughts
An accelerometer is vital, and it is often used in various applications, including detecting earthquakes, medical devices, and mobile phones, among other electrical devices available in the market. Therefore, learning how to interface an accelerometer with Arduino is highly essential.
By mastering this skill, you will be able to design some incredible projects with the utmost ease. Furthermore, the process involved in interfacing the accelerometer using Arduino is relatively easy. When you follow the tips discussed in this article, you will be able to interface the accelerometer with Arduino with the utmost ease.

