
Woodworking is often considered an expensive hobby since high-quality wood typically has a steep price. Even if you’ve got the necessary equipment, buying quality materials might strain your budget.
Luckily, you can overcome this problem with pallet wood. Pallets are used to transport goods, and contractors rarely reuse them after completing a job. But all you need to do is take apart a pallet, and you’re rewarded with multiple boards for at-home furniture-making.
If you want to enhance your garden or backyard with a beautiful table, pallets are the way to go. The boards have a rustic appearance and can withstand extreme temperatures, making the table an attractive and long-lasting piece.
- Finding Pallet Wood
- Making a Pallet Table
- Materials
- Instructions
- 1. Determine the Dimensions
- 2. Break Down the Pallets to Get the Pieces You Need
- 3. Assemble the Frame
- 4. Attach the Legs
- 5. Strengthen the Table Frame
- 6. Arrange and Secure the Tabletop
- 7. Sand the Table
- 8. Drill a Parasol Hole
- 9. Paint Your Pallet Table
- 10. Let It Dry Before Moving It to Its Designated Spot in the Backyard
- Experiment and Enjoy Your DIY Table
Finding Pallet Wood
Before starting your project, you need to know where to get pallet wood.
Pallet wood is easy to find, and if you’re lucky, you might score dozens of boards for free. In addition, there may be planks you’ve stored in the home from previous projects, or your friends or neighbors have leftover material they’re unsure how to use.
Larger construction companies usually have a system for repurposing unused wood and shipping it to equipment stores or other contractors. However, small businesses operate on a tighter budget. As a result, they may not have a protocol for dealing with extra materials.
If there are several up-and-coming businesses around your area, call them and check whether they need help disposing of the wood. Some could attach a small fee to the materials, but it’s also common for small businesses to give pallets away for free.
Another great option is fostering good relationships with businesses that haven’t set up a disposal system. If they’re struggling to remove waste, you could offer your help and take away leftover material.
It’s typically in good condition, and it will allow you to hone your woodworking skills without straining your budget. In addition, the business will be thankful for your help and may decide to call you whenever there are extra pallets. You could even get a batch of material you haven’t worked with before, which is an excellent opportunity to expand your DIY project repertoire.
Remember that you should always get permission to pick up pallets left near dumpsters or waste disposal areas. They might be free, but you should check with the business to confirm before taking them.
Try reaching out to distribution centers if you don’t find a business willing to collaborate with you. They may have pallets that don’t fit their equipment and are happy to give them away for free or for a nominal fee.
Now that you’re familiar with the different ways of finding pallets, let’s see how you can make a pallet table.
Making a Pallet Table
Although people assume woodworking requires a high level of expertise, you can build a pallet table even with limited experience. You’ll make a well-crafted table without difficulty when you’ve got the right tools and are willing to put in a bit of time and effort.
Materials
You’ll need the following supplies for this project:
- Four pallets (make sure one is a 4×4 board you can use to construct the legs)
- 2-inch screws
- Deck paint
- A hammer
- A pry bar
- A circular saw
- A jigsaw
- A drill with drill bits
- 1-3/8 inch Precision Forstner bit
- A ruler and a pencil
- Sandpaper
- Measuring tape
- A miter saw
If you’ve already completed some beginner to intermediate at-home projects, you likely have most of these in your home workshop or garage.
Instructions
Here’s how to make a beautiful pallet table that will elevate your deck or garden.
1. Determine the Dimensions
Constructing pallet tables is a flexible project where you can select the dimensions that meet your needs. If you have a small garden, a compact table is smart to upgrade. When the tall trees in the backyard create a large shaded area, placing a long table underneath creates a perfect relaxation spot.
Regardless of the table size, it’s best to use the longer and thicker pallets for the frame. The pallets that will act as the tabletop don’t have to be as long, but they should be as thick as the frame pallets. This gives the table more stability, so it won’t tip over when loaded with heavier items.
Pallets can be made from softwood and hardwood, so you can choose the material that suits your personal preference. First, however, it’s essential to pick the appropriate size.
At least one wood piece should be 4×4 or approximately 1-inch thick. These dimensions allow you to adjust the piece and create durable legs that provide sufficient support to the table. Steer clear of pallets that have sections of rotting wood or have been sprayed with potentially toxic substances.
2. Break Down the Pallets to Get the Pieces You Need
Pallets are sometimes challenging to disassemble, but a trusty pry bar and saw can take the hassle out of breaking them down.
As pallets usually have three runners, inspect your pallet to check which areas are easiest to pry apart. Runners are boards that go underneath the top pallets and keep them stable. Since they’re tightly secured to the boards, pry bars and saws have enough power to remove them quickly.
A circular saw will go through the top boards efficiently, allowing you to separate them from the runners on the edge of the pallet. Using a flat pry bar, remove the boards connected to the middle runner and pry off the bottom panels.
After deconstructing the panel, assess the pieces and decide which will serve as the frame, legs, and tabletop. Cut a few pieces with your saw if necessary to achieve the optimal size.
Remember to wear protective gear, even if you’re used to handling saws. A few small nails could be hidden in the wood, so always cover your eyes and hands to prevent injuries.
3. Assemble the Frame
If you’re going for a square-shaped table, double-check the frame boards’ measurements before putting them together.
For a rectangular appearance, place the shorter boards on the inside of the frame. Ensure that the corners are aligned and connect the boards with screws. There should be at least two screws on each corner.

4. Attach the Legs
For DIY deck tables, the best practice is to set them at the same height as the indoor tables. This ensures that they’re comfortable for all household members, and you can easily shorten the legs in the future.
Once you’ve got the desired length, insert each leg into the frame corners and attach them with four screws. Two screws should go through each side of the corners, so you’ll need 16 screws to secure the legs. Although this will keep the legs in place, you can insert a few smaller screws if you feel the material needs more support.
5. Strengthen the Table Frame
Attach three thinner boards on the inside of the frame. They’ll strengthen the tabletop that covers them, allowing you to secure the top panels with screws. Of course, you can skip this step if you’re using durable hardwood panels.
6. Arrange and Secure the Tabletop
For a sleek look, place the top boards over the frame and saw off the protruding ends so there’s no overhang. However, a larger tabletop has more functionality, so you might want to leave an inch or two for overhang. Next, attach each board to the frame with fours screws, two on each side.
7. Sand the Table
Sand the table to remove splinters and uneven edges and smooth out minor imperfections.
8. Drill a Parasol Hole
This is an optional step, but it’s helpful if you plan on spending a lot of time enjoying your garden and basking in the sun.
Use a measuring tape and a ruler to determine the center spot of the table. Place the bottom of the parasol pole over the center spot and trace the outline with a pencil. Next, cut the circle with a jigsaw. For a clean cut, avoid twisting the blade.
Insert the pole to check whether the hole’s a good fit for the parasol.
9. Paint Your Pallet Table
Place some old fabric on the ground and flip the table upside down. After selecting a color, paint the center boards first and work your way towards the frame and legs. Once the underside dries down, return the table to an upright position. Next, paint the surface areas, starting from the middle and moving towards the legs.
10. Let It Dry Before Moving It to Its Designated Spot in the Backyard
Now you can enjoy a picnic or a quiet evening surrounded by nature without leaving your backyard or garden. In addition, thanks to its durability, you can leave your pallet table outside during the winter without worrying about it crumbling under heavy snowfall.
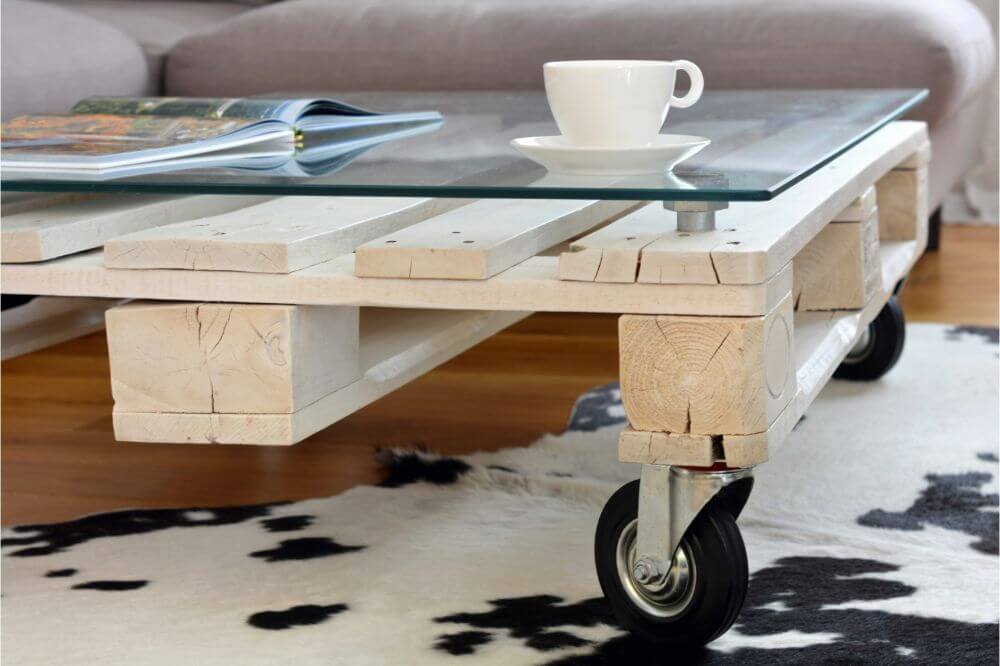
If you have multiple pallet stacks sitting beside the house, you can modify these instructions and make a smaller indoor coffee table. The only thing you’ll need to do is a bit of sawing to get smaller boards. In that case, don’t forget to always wear protective gear and shield your eyes and hands from flying splinters.
Experiment and Enjoy Your DIY Table
If you’re unsure about investing in expensive panels, pallets are an inexpensive alternative that will allow you to make unique long-lasting pieces with a rustic feel. Although this DIY project is relatively simple to complete, you can always ask friends and family to join in on the fun. Depending on the size of the pallet, you might need some help maneuvering and cutting the boards.
You could even set new challenges for yourself to develop your woodworking skills further if you’re satisfied with the finished result. For example, two pallet wood benches or a set of garden chairs would go well with your table, especially when painted the same color.