When talking about technological marvels, we cannot overlook the various innovations in information technology and the entire computing scene. One of the areas that seem to be developing by the day is the internet of things (IoT). It describes the connection of various physical objects through a network, something noticeable in home automation, and, at times, robotics.
There are several resources to help with the internet of things concept, and one of them is the Arduino platform. This platform provides both hardware and software components, all of which are open-source and easy to use. It continues to grow and cements its place as the backbone of several tech projects.
For Arduino to work, it needs an internet connection, which is also responsible for networking. Here is where Wi-Fi connectivity plays a key role. In such a scenario, the ESP8266 is of excellent service. Your curiosity may lead you to ask how to use ESP8266 with Arduino, something this article will gladly show you.

A Look at The ESP8266
The ESP8266 is a budget Wi-Fi microchip, featuring microcontroller capability and supports the internet protocol suite. Its affordability and simplicity are among the factors that make it one of the most preferred Wi-Fi microchips.
You can use the ESP8266 with Arduino for many of your projects, with the simplicity of both playing a role in their compatibility. Both are also cheap to run, and you have a sea of ideas when you combine the features of Arduino’s open-source software and hardware with this Wi-Fi microchip.
The ESP8266 has minimal external components, a feature that further boosts its usability.
Steps on How to Use ESP8266 with Arduino
Follow these steps to link the ESP8266 to Arduino.
Step 1: Connect Arduino to The Breadboard
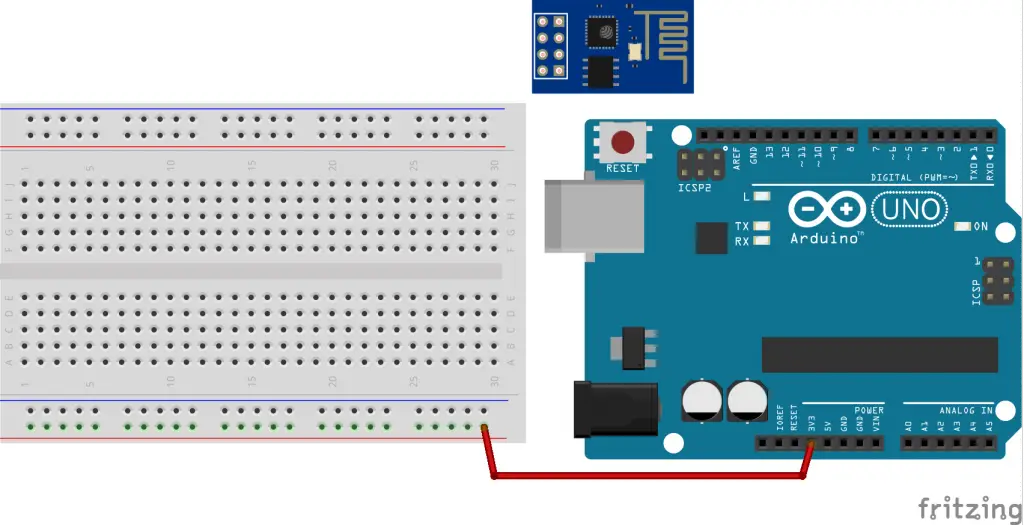
Start by connecting the Arduino’s 3.3 volts to the breadboard’s redline. At this stage, a point to note is that ESP8266 is 3.3 volts; hence, it will work with 3.3v instead of Arduino’s 5 volts rating. If there are other components with a 5 volts rating, you may link them to the red line’s 5V output on the breadboard. Be careful not to get mixed up.
Step 2: The Connections
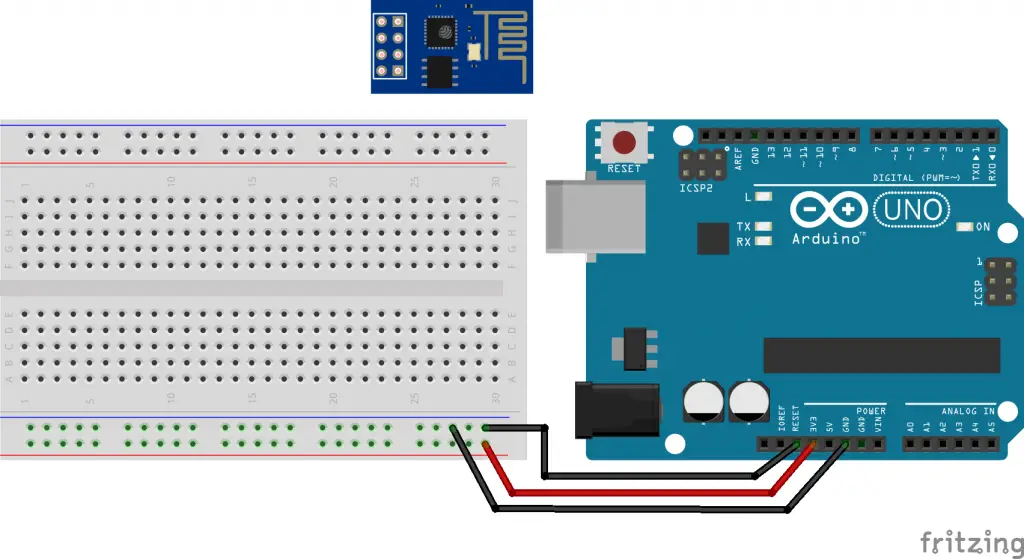
The board should have labels to guide you on how to fix the wire connections. The GND is the grounding, and you have to connect it to the blue line on the breadboard. Then connect the RES or reset pin to the blue line, where you ground it. Grounding the reset pin will have the Arduino board act as a dumb USB to the serial connector, which is perfect for the Wi-Fi microchip.
Step 3: Linking Arduino to ESP8266
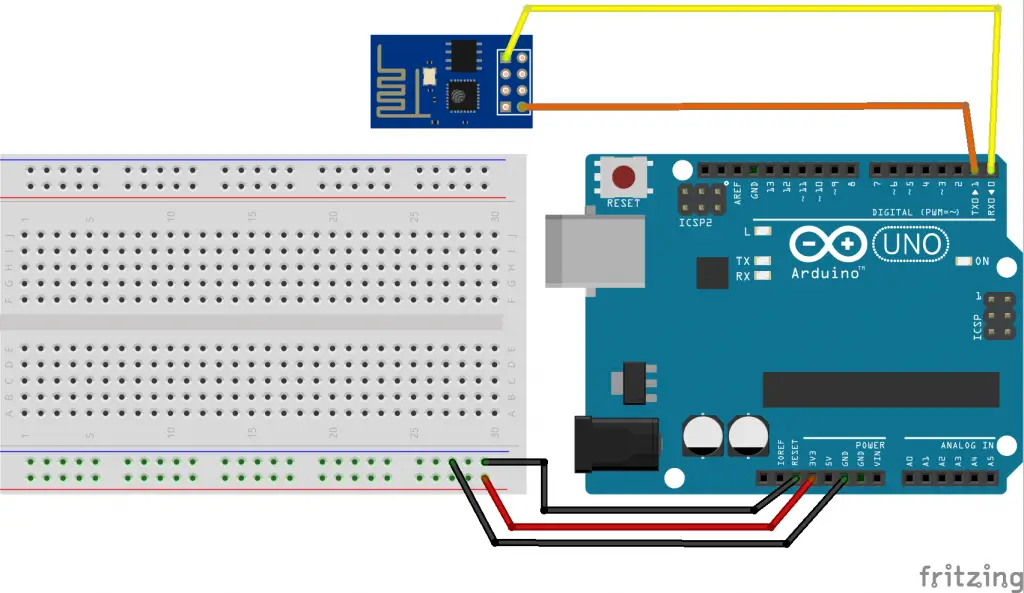
You now connect the two components by connecting the Arduino’s RXD pin to the ESP8266’s RX pin. Follow up by connecting the TXD pin from the Arduino board to the ESP’s TX pin. You might get confused at this point as typically, when we want two components to communicate with each other; we connect their TX pins to their RX correspondents.
However, in this case, we want the computer to communicate to the microchip through Arduino, explaining these connections.
Step 4: Making the Final Connections

You now make the final connections to have the system in good shape. Here, you connect the ESP’s grounding pin to the blue line and the VCC pin to the red line. Then finalize the system set up by connecting the CH-PD to the red line. If you do not do the last step correctly, the connection may fail to work.
Breaking out the CH-PD helps disable the system when not in use and can help conserve power.
Using Arduino IDE
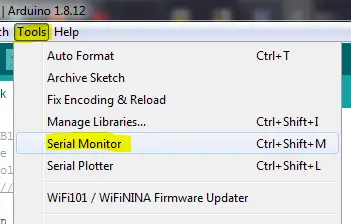
When you use Arduino’s integrated development environment, you do not choose a board as there are no uploads. In this setting, you go to the tools’ menu and click on the serial monitor. You then set the baud rate to the ESP’s default, which is 115200. You also change the line endings to Both NL and CR.
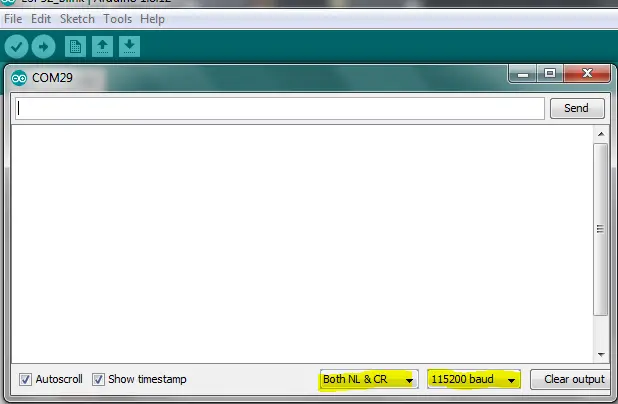
You can check out the system’s setting by keying in ‘AT’ in the message field. It should respond, ‘OK.’
You now finalize the process by updating the ESP8266’s firmware. This action keeps you up to date with upgrades. You may also make downgrades where need be.
Why the ESP8266 Is Popular
Highlighted below are some of the reasons this microchip is famous and why you should use it for your next project with Arduino.
It Is Affordable
One of the main factors behind its fame is its affordability. This factor makes it suitable for various projects, even if they are for testing purposes. It is one reason why hackers loved it when it first came out in the market as they could easily purchase it, giving them value if their plans went smoothly.
Compatibility To Development Environments
The Wi-Fi microchip is also excellent to use with Arduino due to its compatibility with various development environments. This feature makes it versatile, and there is hope for more development of the ESP8266 to make it more stable when looking at compatibility.
Abundant Learning Resources
The ESP has plenty of learning resources, which enhances its functionality. There are books and journals dedicated to this microchip. The translations of the learning resources to English further boosted its popularity.
Other factors include having an active maker community, incentive programs, and its convenient development.
Final Say
Arduino is one of the best platforms to bank on when coming up with several DIY projects, especially those in robotics and the internet of things. We can see how to use ESP8266 with Arduino, where it sorts out the connectivity needs.
The ESP8266 is very affordable and flexible to use, which is one reason you should opt for it as an ideal component for your project. It also has minimal external components, making it easy to handle.
Follow the highlighted steps and bring any of your projects to life, benefiting from both the ESP8266 and Arduino’s simplicity and friendliness.

