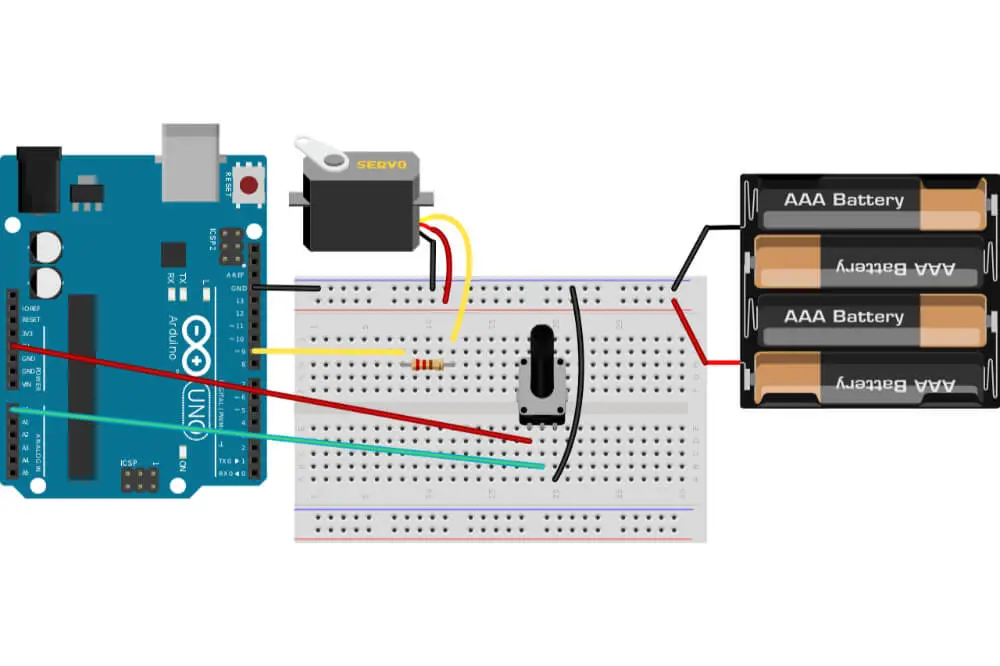
Servo motor is an electric device that is used for precise angular rotation control. This motor is often used in projects that need precise control over motion, such as when controlling a robot arm.
Usually, the servo motor’s rotation angle is often controlled by applying the MWN signal. When you vary the width of a PWM signal, you will be able to change the rotation angle along with the motor’s direction.
Understanding how to interface a servo motor with Arduino is vital for all DIY enthusiasts out there. Therefore, in this article, we shall be discussing the process involved in interfacing a servo motor with an Arduino.

What is a servo motor?
A servo motor is a DC motor which is controlled at a specific position. Furthermore, you might as well consider the servo motor as a linear actuator or rotary actuator that has been designed to allow its control at a particular angle. The servo motor has been present in the field for an extended period, and it is used in several vital applications.
In addition to that, servo motors tend to be relatively small in size; however, they tend to be energy efficient and feature several advantages. You might consider using a servo motor in airplanes and robots, along with other electrical projects. With that said, let us go through interfacing servo motors with Arduino.
Connect the components! 🙂

Interfacing servo motor with Arduino
You should note that in this article, we shall be using a single servo motor. This means that the code used here is intended for one servo motor. You will be required to change the code when working with several servo motors.
By understanding the codes used in this article, controlling multiple servo motors becomes relatively easy. There is no doubt that Arduino IDE is the best tool when it comes to developing and uploading codes to an Arduino board.
The first thing you will have to do is install the Arduino IDE. To do this, you will have to download the Arduino software on your PC and then proceed to install it. Once you have it installed, you will go ahead and open it.
Usually, there are two ways in which you can include a library in an Arduino IDE; the first one is going to sketch and then click on include library and then Servo. The second option is typing #include<Servo.h>. In today’s project, we shall be using the library name Servo.h.
You will go ahead and declare an integer type variable. We shall be using the name of the variable as pros. This particular variable will only hold the integer values. You will also need to declare a different variable in a declaration part.
We shall be using the name of the variable as Yourservo. You might consider using any other name that will best suit your needs. Once that is done, this particular variable will be connecting the corresponding Servo to your entire code. We shall be using Servo as the keyword while Servo variable_name is considered as the syntax. Your code should be looking something like this: Servo Yourservo;
If you have been using Arduino for a long time, you definitely know that every Arduino program consists of a void setup() statement along with the void loop() statement. Whenever you turn your Arduino, the statements or functions in the void setup() start working, and it will only work once. Once that is done, the statements or functions in the void loop() start working like a loop.
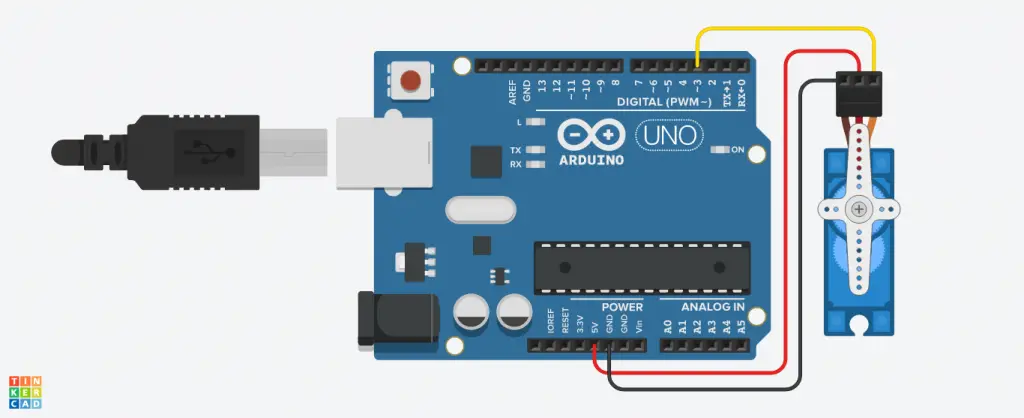
You will be required to set a signal pin of your servo motor to an Arduino pin in void setup(). Basically, we shall be declaring the specific Arduino pin that will be controlling your servo motor. We shall be using the Arduino digital pin number 3 in order to control a servo motor.
We shall be using attach as the keyword. Your syntax should be variable_name.attach(pin_numer), and your code should be something like this Yourservo.attach(3);
It is best to discuss the control statement of your servo motor. Write() will be the keyword while variable_name.write(pros) will be the syntax. In the write function, you might consider using a number or variable that is between 0 and 360. Your code will be Yourservo.write(pros)
Once that is done, you will be required to set your loop function. In order for us to control the servo motor, we shall be used for() as loop function. Set a maximum value of 0 in the for() loop function; that is (.pros=0) and 180 as the maximum value; that is (pros<=180).
You will go ahead and increment pros; that is (pros++). With that done, you will go ahead and implement a write function, Yourservo.write(pros), in your for() loop, and then add the delay function. Usually, a delay function helps in waits 15ms for your servo motor to attain the position. Your code should be something like this for(pros=0;pros<=180;pros++){ Yourservo.write(pros);delay(15);}
You will then go ahead and add a different delay function after your for() loop function. The new delay function for is used for wait corresponding time (including delay function) after the previous for loop. The new delay will be a delay(1000);
You will not be required to set a different loop function. We shall be using for() loop in controlling servo motor Set a minimum value of 180 if the for() loop function; that is (.pros-180) along with a maximum value of 0; (pros>=0). You will then decrement the pros; that is, (pros–).
Once that is done, you will implement a write function, Yourservo.write(pros), in a loop. Go ahead and add the delay function. The added delay function will help to wait for 15ms for your servo motor to attain its position. Your code should look something like this; for(pros+180;pros>=0;pros–){Yourservo.write(pros);delay(15);}
With that done, you will go ahead and add a different function after for() loop. The added new delay function for acts a wat corresponding time (including delay function) after the previous loop. The new delay will be a delay(1000);
By now, the coding process will be over. Usually, the completed code will be given in the Arduino IDE. You should consider typing the entire code and then assess for any error that might be present. Once that is done, you will upload the code to your Arduino board, and you will be able to power your servo motor with the utmost ease.
Final word
Interfacing servo motors with an Arduino board is relatively easy. All that is required of you is to follow the tips discussed in this article. With the right tools and codes, you will be able to achieve interfacing your servo motor with the Arduino without facing any difficulties.
As we come to a conclusion, we hope that you find this article helpful as you start your journey on interfacing servo motors with Arduino.

