A metal detector is a fun thing to use outdoors. A person may find some cool things and they can find some interesting things that may have been forgotten about. They may find gold or they may find some items with historical value. Metal detectors can be expensive but with some tips, a person can build their metal detector.
They can use their Arduino to make a metal detector at home. They will need some coils, wiring, and they may even want to add an LED speaker or screen. These items from around the home can be turned into a metal detector and help a person find some cool things while they are walking out and about.
The Connection and the Flow
When electricity will come in contact with the coil and it will begin to blow a magnetic field will begin. Any changes in this field will result in a magnetic field that has the opposite charge. This can lead to an increase in voltage. If there is a metal object that will go near the coil it will change the inductance.
The metal can either make the current increase or decrease based on the type of metal that is found. If something is not very metallic such as aluminum it will reduce the intensity of this magnetic field. Other materials such as an iron will align with the field and a person will know that it is there.
Items Needed for the Metal Detector

- Arduino UNO
- 4m wire (to make coil)
- 10nF Capacitor
- 3 Resistors of 220 Ohms (to limit current)
- 2 LEDs of different colors
- USB power bank with a cable for connection (for powering the Arduino board)
- Passive Buzzer (for sound/alert)
Search Current
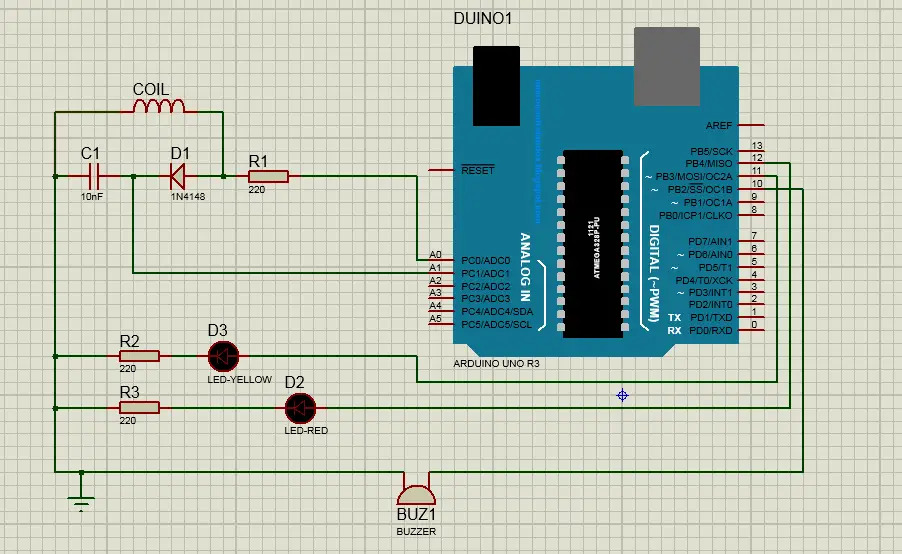
To make the search coil a 4m stranded wire should be wrapped around a cardboard cylinder. The cable should be below 20 Ohms. This metal detector is not going to have many external components. It will not be bulky and the Arduino will be a good size. Using a breadboard the 220 Ohm resistor is connected to the diode with the negative terminal leading towards the capacitor.
Once this has been done the A0 is connected to the resistor. Do not connect this to the diode.
The A1 is connected to the cross point of the diode and the capacitor. It should be right in the middle of both of these devices. The non-connected terminal of the capacitor should be connected to the ground at this time.
One end of the coil is connected to the resistor diode where they meet at the cross point.
The other end of that coil is then connected to the ground.
Once these main parts have been connected it is time to connect the LED. One of the LED lights is going to be connected to the positive terminal. It should be connected to the pin 12 and the negative terminal. To connect to the negative terminal a person will need to go to the 220 Ohm resistor that is connected to the ground.
The other Led should be connected to the positive terminal which can be found at pin D11. The negative terminal will then be connected to the 220 Ohm resistor that is the ground.
A person can choose to connect a passive buzzer to the headphone connections or they can connect a speaker. This will be connected between pin 10 and the ground. A resistor can also be added to this if a person is looking to reduce and have some control over the volume.
Connect the components! 🙂

Going Outside
If the metal detector is going to be used outside it will need a solder. A 7×5 cm prototype board can fit the Arduino and everything that is connected to it. the USB will then be connected to the port of the Arduino to provide power.
Software
A person will need to upload the Arduino sketch. Once it has been uploaded a person should allow it to run. They may want to use debug=true so they can tune it as needed. They should aim for an ADC reading anywhere from 200 to 300. Decreasing or increasing the number of pulses will cause the metal detector to have different readings. A person should then put the coil near metal to see if it will make a sound. They should then move it away from the metal and the sound should stop.
Mounting
The Arduino detector should be mounted on a stick to make it easy to use. A selfie stick is a good tool since it is light and adjustable. The power bank can also fit on the selfie stick making it easy to use. The board can be attached with cable ties and the coil can be placed on the stick.
A person then has everything they need to go out and find some treasure. If a person comes in contact with metal the LED will begin to flash and the detector will begin to beep or buzz.
This metal detector is made at home using the Arduino. This will allow a person to use this to go out and hunt for metal objects. While they may not get rich or find anything of value with the metal detector it is still a fun pastime and a good way to enjoy the outdoors.
This guide will help a person make sure everything is set up correctly. All they need to do is follow the steps to make the metal detector using Arduino. With proper guidance, a person will then be able to have this complete in no time.


