
There are many gadgets on the market including the Arduino. It is becoming more popular for common use. This program can be used to create many different projects and it will make things easier. A person will learn how to install the ATmega 8 and the chip into the Arduino code so things can be more compact.
This will allow a person to continue to work their electronics. They will be able to use oscillators to help and the 8Mhz crystals that come with the ATmega 8. A person can follow a few steps and download some items and everything will be ready for installation.
Items Needed for Installation
- Arduino UNO
- ATMEGA8 IC
- 2 Capacitors 22pF
- 1 Crystal Oscillator 16 MhHz
- Resistor 10k Ohms
There are some things that will need to be downloaded as part of this installation. A person is going to need to be willing to download some specific programs. They will need the Bootloader for the ATmega 8 and they will need to download the Arduino IDE v1.01.
These links can be found on the internet and a person can download them to make sure their system is updated and has the most current version. The most current version will allow a person to have the best connection and the best chance of everything being successful. This program is also updated often and a person should have the latest version with the latest features.

Working with the Arduino
Arduino can be converted into a programmer that will be needed for this installation by uploading the ArduinoiSp sketch. This will allow a person to have access to the codes. When the program has finished uploading they will be ready to go. It may take some time for the upload to be complete and a person should not be alarmed at this time.

After the Upload
After a person has downloaded the Arduino v1.01 they will need to extract the folder. They can also copy the entire text and use the code boards.txt to make sure their file is complete. They will then enter this information with the extracted folder, /Arduino-1.01/hardware/Arduino/boards.text. A person will need to copy and paste this so it can be opened. A person will then open the Arduino.exe where they have extracted it. They will then be given a selection on the Arduino board.
It will be Atmega8-noxtal @ 8MHz. a person will then select the Arduino as an ISP programmer. This is then set up and it is ready to go. From this point on a person can begin to hook up the connections and they will be able to plug in the devices and wire them together.
Hooking up the Connection
Once the download has been completed and extracted it is then time to begin the connection and there will be time to hook up the connection. A person will need to wire the ATmega18 IC with the Arduino. A person should be aware of the 10uF capacitor which is found between the Reset and the GND.
This will help a person know where to start with the wiring. They will need to follow the guide so that all of the wires are connected properly. If a person does not have the wiring correct things will not work and they will need to troubleshoot to get the right connections.
Burning
A person will go to the tools on the screen and they will select the burn bootloader so that they can continue to set things up. Once this has been picked a person will use the code atemga8-noxtal.zip so that they can begin the extraction process.
If the Arduino has been running it should be restarted at this time. A person will then check the programmer and the ports to make sure everything has been set up correctly. They will then hit the burn button and the lights on the Arduino will begin to glow. This is a sign that it is working.
After the Burn
Once the ATmega8 has been burnt a person will then be able to continue to the final steps of this project. They will need to update the specific sketch they are looking for to the chips. The board will need to be set to the Atmega8 and the programmer will also need to be sent to the Arduino as ISP. The writing will be used for the burning and the sketches too.
There is a simple way to help make sure this sketch is going to be working. A person will use the Arduino as a programmer. A person will need to press ctrl + Shift+ U. this will tell the programmer that the chips are through the Arduino.
Setting up the Connection
There are some connections that will need to be set up. There is a guide to help a person make sure everything they have is connected properly so that things will work as intended. The Ch340 is going to be connected right to the Atmega8.
The VCC will go with the same VCC connection and these connections are labeled. The GND will also be connected with the other GND. This will also be labeled. The Tx will connect with the RX/ PDO. The Rx on the once device will then connect with the Tx/ PD1 on the other. These connections are going to be opposite and this will help set up all of the connections properly.
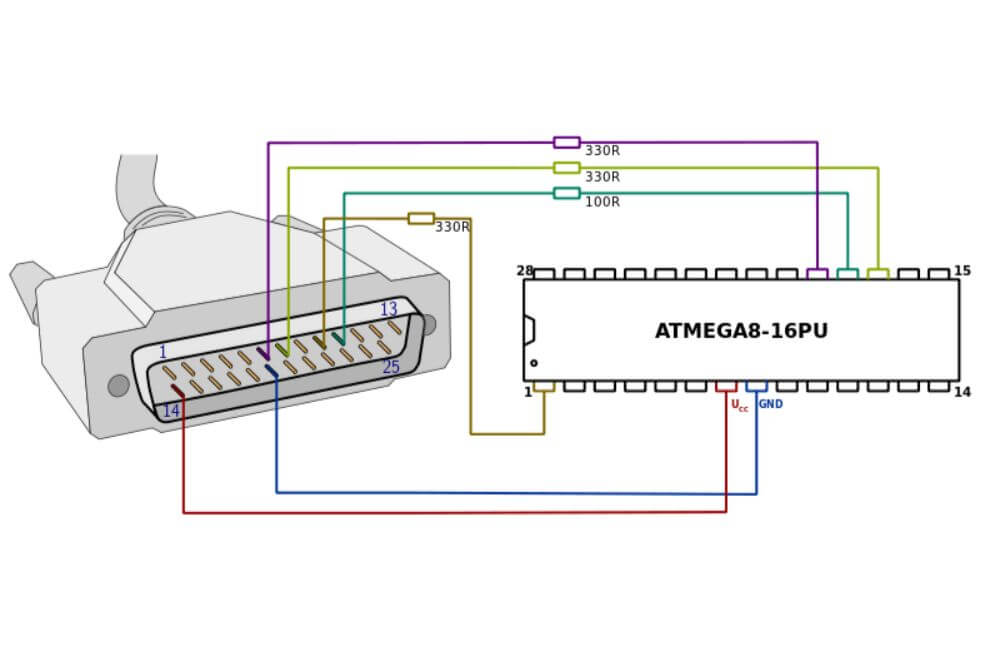
Connect the components! 🙂

This is a way that a person can connect the Atmega 8 with their Arduino. This will allow a person to have additional features and the process is simple. All they need to do is download the required information and then connect the devices. This will allow a person to have access to more features and they can do more with both the Atmega8 and the Arduino.
