
The realm of electrical and telecommunication cabling systems is complex, intricate, yet incredibly fascinating.
A particular cable type that underpins this vast and interconnected world is the coaxial cable- ubiquitous in both household and commercial applications.
It is imperative to not only familiarize oneself with the structure of these cables, but also comprehend the art of accurately attaching connectors using a coaxial cable crimping tool.
The crux of this discourse delves deep into the world of coaxial cables, demystifying their structure, analyzing their types, and elucidating the indispensability of proper crimping.
Further, it aims to provide an insightful understanding of the parts and functionality of a coaxial cable crimping tool, coupled with a thorough guide on correctly crimping a coaxial cable.
Understanding Coaxial Cables
If you’ve embarked on the journey of amateur radio or audiovisual system setting up, chances are coaxial cables aren’t foreign to you.
Heck, they’ve probably become as familiar as a beloved pet! These are more than just the unsightly spaghetti that lurks behind your TV setup or radio station.
Understanding their essential attributes can make all the difference to performance and efficiency.
The first thing that everyone should know about coaxial cables is that they are designed to transmit electrical signals or power without any significant loss of energy.
One of the core features of a coax is its excellent immunity to noise and interference. Thanks to the specially made protective shield, they block out any external electromagnetic interference, guaranteeing that high-quality signals always reach their intended destination.
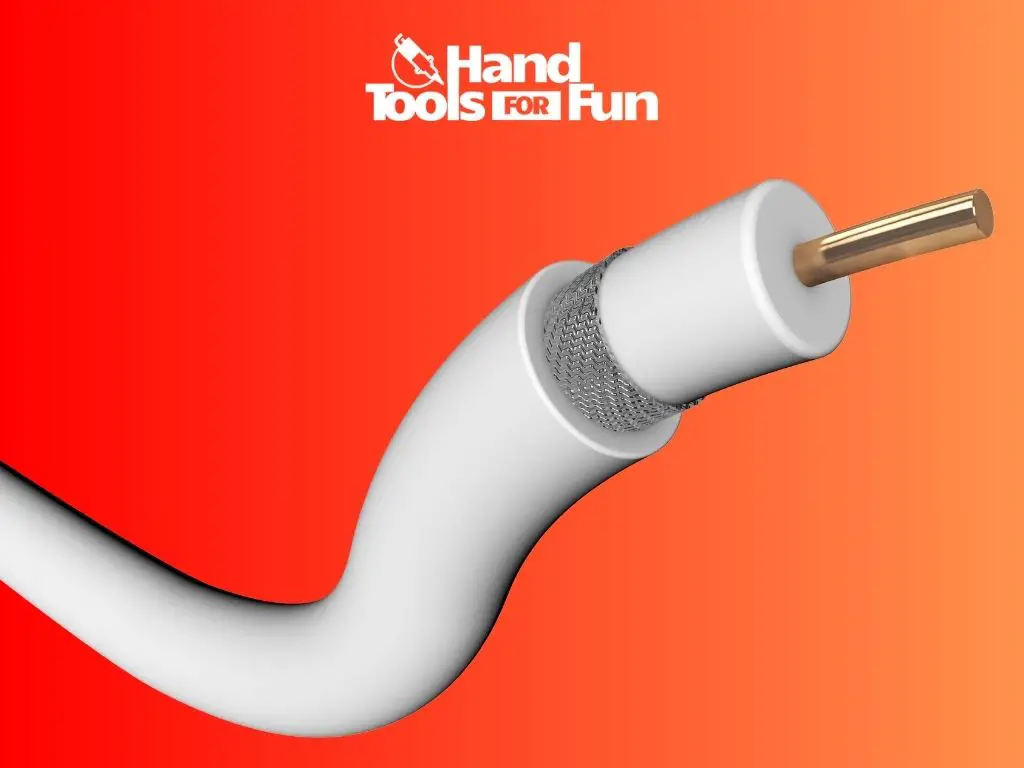
Coaxial cables sport an inner conductor (or core) that allows the flow of electrical signals. This core is often composed of copper or a copper alloy, material which is known for its excellent conducing properties.
This core is typically solid, but in some instances, it can be composed of multiple small wires, called ‘stranded’. A larger conductor often means less resistance and greater capacity to carry signals.
The aforementioned shielding does two tasks rather brilliantly – it keeps interference at bay and prevents the leakage of signals.
This shield comes in two varieties – foil and braided. Foil shields provide full coverage around the inner conductor, ensuring maximum protection.
On the other hand, braided shields, made up of little copper strands twisted together and wound around the dielectric, offer strength, flexibility, and considerably less signal leakage.
In between the internal conductor and the shield is the dielectric insulator. It is an insulating material that carries the electromagnetic waves, reduces signal loss, and keeps the inner conductor and shield apart.
It’s crucial to note that the composition and quality of this dielectric can significantly impact the cable’s performance.
The lower the dielectric constant, the better the cable’s ability to carry digital signals over longer distances.
The final coating that wraps everything up is the protective jacket. This cover can be made of PVC, PE, or LSZH material and serves to shield the cable from physical damages. It also offers a level of safety by preventing electrical shocks.
Summing up, the coaxial cables might appear as quite simple everyday items, but they are canonical components of any serious electronics setup.
Their design and functionality are centered around delivering optimum performance, blocking external interference, and ensuring the safety of the users.
Understanding their essential features certainly helps when it comes to making the right choice for your thrilling hobbyist adventures. Until next time, keep connecting!
Coaxial Cable Crimping Tool Familiarization
Delving Deeper: The Intricacies of a Coaxial Cable Crimping Tool
After thoroughly understanding the purpose and structure of a coaxial cable, let’s shift our focus towards one of the vital elements that enables its optimal functioning: the coaxial cable crimping tool.
This device, compact yet power-packed, is integral to the process of securing connectors onto your coaxial cables, making it a crucial part of your amateur radio or audio-visual system setup.
To simplify, a coaxial cable crimping tool works as a mechanical device that ‘crimps’ or fastens connectors onto the ends of a cable.
These connectors are what interface your cable with other equipment in your system, creating a critical link in the chain that allows signals and power to flow seamlessly.
Comprising of a pair of gripping handles connected to a crimping or crushing end, this tool can appear deceptively straightforward. But like every specialty tool, its simplicity belies the crucial role it plays.
Imagine this tool as a master craftsman working on a specialty cable—each delicate maneuver it executes during the crimping operation impacts the cable’s overall signal transmission quality.
One missed step, and the signal could prove faulty or weak, rendering your entire system inefficient.
Thus, it’s not a stretch to say that understanding the coaxial cable crimping tool is as significant as understanding the coaxial cable itself.
As a hobbyist, you might come across several types of crimping tools, each varying in design based on the specific type of connector or cable they’re intended for.
However, the crimping process generally remains the same. With the cable properly stripped and the connector aligned correctly, the crimping tool applies a precise amount of pressure to the connector, creating a secure connection that is free from any unwanted gap or space.
The crimping tool achieves this secure connection by pushing or reshaping the connector onto the cable, effectively procreating a ‘cold weld’ between the connector and the cable. This tight bond ensures optimal signal transfer, minimizing potential signal loss or interruption.
The durability and efficiency of this method have made crimping a highly preferred technique over alternatives like soldering.
Besides being labor-intensive and time-consuming, soldering also requires a fair amount of skill and faces issues like poor joining, overheating, and oxidation.
The coaxial cable crimping tool truly represents the sweet intersection of simplicity and sophistication—a compact device offering tangible solutions in a world revolving around intangible signals.
While it’s a distinct component, it aligns seamlessly within the larger context of your setup, reinforcing the importance of every minute element when it comes to setting up an efficient, functional system.
So on to the next segment – strap your safety gear and get ready to delve into the hands-on crimping process.
Practical Coaxial Cable Crimping
Now that we have a solid understanding of the nature and importance of coaxial cables, not to mention the significance of a trusty coaxial cable crimping tool, let’s dive into the nitty-gritty—the hands-on process of crimping a coaxial cable.
To start, in your toolbox you’ll need a pair of wire cutters, your crimping tool and of course, your chosen coaxial cable and connectors. Now, let’s break down the procedure step-by-step.
- Cutting the Coaxial Cable: Before everything else, measure the required length for the cable, then use the wire cutters to slice through the cable. Cutting it at a right angle is crucial for it to fit securely into the connector later on.
- Prepping the Cable: Now, coaxial cables have elements layered inside, remember? You’ll need to carefully strip away the outer protective layer, revealing the braided shield underneath. A coaxial cable stripper comes in handy for this, but a sharp knife will do in jiffy. Be careful not to nick the inner layers while doing this.
- Peeling Back the Shield: Once the shield is exposed, carefully peel back the braid without removing it altogether. You should now see the dielectric insulator, which also needs to be trimmed off to expose the inner conductor.
- Inserting the Connector: Now, with the inner conductor revealed, it’s time to slide on the connector. Place it over top of the layered cable elements, ensuring that it fits snugly against the inner wall of the connector.
- Crimping the Connector: Here’s where the crimping tool comes into play. Lay the cable-with-connector attached within the crimping tool, so the tool’s open jaws close on the connector’s crimp sleeve. Apply pressure until you feel the connector squeezing onto the cable.
Voila! You’ve successfully crimped a coaxial cable. The quality and strength of this connection will highly impact the integrity of signal transmission, so it’s crucial to do it correctly.
Remember, practice makes perfect, and before you know it, you’ll be crimping coaxial cables like a pro.
While the process may initially seem daunting, especially if you’re new to this hobby, don’t be discouraged.
It might take a few attempts to get it right, but the satisfaction you’ll derive from building your own secure and efficient cable system is unmatched.
Don’t forget, the world of coaxial cables and crimping tools is vast, and you’re just at the start of a rewarding radio or AV adventure. Stay tuned!
Tailoring a synchronized approach through a comprehensive understanding of coaxial cables, the appropriate use of crimping tools, and honing the skill of expert cable crimping is pivotal to ensure an effective cabling system.
The assumption that coaxial cable crimping is a simple and monotonous job is incorrect. Rather, it is a precise science that necessitates a clear understanding and apt technical skill set.
This discourse provided an in-depth exploration and practical insight into these skill sets. Having mastered these, enthusiasts and hobbyists alike can revel in the satisfaction of building efficient and reliable cable connections, and thus, participate in shaping the intricate, interconnected dancers of technology in our modern world.
