With a keypad, you will be able to interact with your project with the utmost ease. When using a keypad, you will be able to navigate through menus, control robots and games as well as enter your passwords, among other vital functions.
In this article, we shall be discussing how to add a keypad library in Arduino. You will be able to understand how an Arduino is designed to detect key presses and how you can as well find the pinout of any particular keypad. Without further ado, let’s get started on our today’s topic.

Overview
In this article, we shall be using 4 by 4 matrix membrane keypad; however, you might as well consider wiring as well as code diagrams for the 3 by 4 matrix keypads. Most DIY enthusiasts prefer working with style keypads since they are thin and have adhesive backing allowing you to stick them on almost all flat surfaces.
You might as well consider getting a telephone-style keypad, which is equipped with thicker buttons if you find it being a better design. In addition to that, the salvaged keypads from an old telephone can work with an Arduino.
How do keypads work?
Understanding the concept of how keypads work is vital. Usually, buttons on keypads are often arranged in columns and rows. This means that a 3 by 4 keypad features 3 columns and 4 rows. On the other hand, a 4 by 4 keypad is equipped with 4 columns and 4 rows.
Each key is equipped with a membrane switch under it. Usually, every switch in a row is connected using a conductive trace that is beneath the pad to other switches in a row. Furthermore, every switch in a column is also connected similarly to switches in a row. The column and row are then brought to a single pin with a total of 8 pins on a 4 by 4 keypad.
When you press a button, the switch is closed between the column and the row trace; this allows the current to flow between the row and column pins. Once that is done, the Arduino will be able to detect which button was pressed through detecting column and row pin, which is connected to the button.
Usually, this occurs in four steps:
- The first step, when there is no particular button pressed, the column pins will be held high while the row pins will be held low.
- Once the button is pressed, the column pin will be pulled low, allowing the current from the high column to flow to the row pin below.
- An Arduino will detect the column in which the button is located; this allows it to find the row in which the button is connected to. It achieves this by switching all the row pins high and then reading all the column pins to detect the column pin that returns to high.
- Once the column pin goes back high; the Arduino will find the row pin in which the button is connected to.
Adding keypad to Arduino
Most membrane keypads are equipped with a pin layout with the following:
3 by 4 keypads
· R1
· R2
· R3
· R4
· C1
· C2
· C3
4 by 4 keypads
· R1
· R2
· R3
· R4
· C1
· C2
· C3
· C4
When it comes to adding a keypad to Arduino, the first thing you will have to do is install the keypad library; you can either use Alexander Brevig or Mark Stanley. The library is vital since it takes care of setting up your pins as well as polling different rows and columns.
Code for a 4X4 Keypad:
Once the Keypad library is installed, you can upload this code to the Arduino if you’re using a 4X4 keypad:
#include <Keypad.h>

const byte ROWS = 4;
const byte COLS = 4;

char hexaKeys[ROWS][COLS] = {
  {'1', '2', '3', 'A'},
  {'4', '5', '6', 'B'},
  {'7', '8', '9', 'C'},
  {'*', '0', '#', 'D'}
};

byte rowPins[ROWS] = {9, 8, 7, 6};
byte colPins[COLS] = {5, 4, 3, 2};

Keypad customKeypad = Keypad(makeKeymap(hexaKeys), rowPins, colPins, ROWS, COLS);

void setup(){
  Serial.begin(9600);
}

void loop(){
  char customKey = customKeypad.getKey();

  if (customKey){
    Serial.println(customKey);
  }
}
After the installation of keypad library, you will go ahead and upload the right code when using a 4 by 4 keypad or a 3 by 3 keypad. Once the code is uploaded, the third and fourth lines in the code will set the number of columns and rows on a keypad.
On the other hand, the 6th and 11th lines will define the character being printed whenever you press a particular button on your keypad. If the keypad is equipped with a unique layout, you might consider defining the type of character you would like to be printed whenever a button is pressed. Once the code is uploaded, you will go ahead and open your serial monitor, and when a key is pressed, you will be able to visualize the value being printed out.
Wiring keypad to Arduino
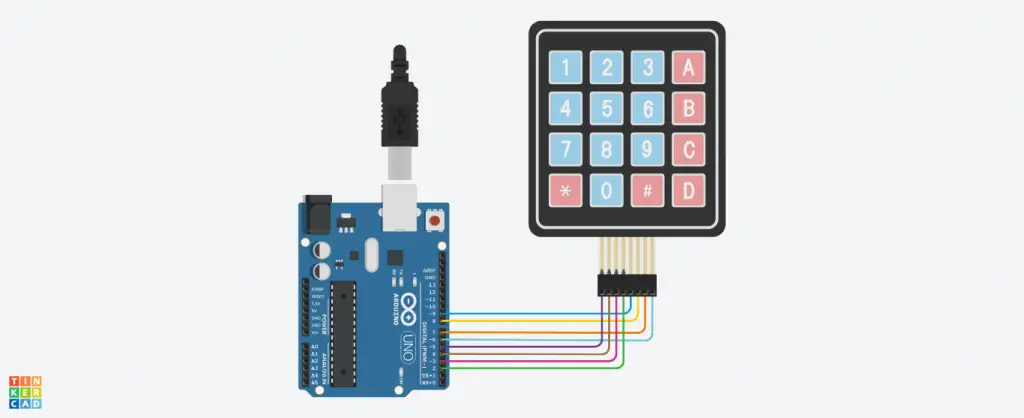
To connect a keypad to an Arduino, you should consider connecting pin numbers 8, 7, 6, and 5 on your keypad to the digital pins of your Arduino, which are 5, 4, 3, and 2, respectively. On the other hand, the keypad pin numbers 4, 3, 2, and 1 should be connected to the Arduino’s digital pins numbers 9, 8, 7, and 6, respectively.

Finding a pinout for a keypad
In case your keypad is equipped with a different layout, as discussed in this article, you might consider probing your pins in order to figure out. To do that, you will have to build a test circuit and then connect an LED along with a current limiting resistor to your Arduino or a 5V power source.
With that done, you will use this setup to identify the button rows first of all. At the first pin on the left, you will go ahead and insert the ground wire. Once that is done, you will press a button in row 1 and then hold it down. The positive wire will be inserted in each of the other pins and go ahead, finding each row whenever the LED lights up.
To find columns, insert the ground wire in a pin that you know in the row1. Go ahead and press hold on any button and hold in that row. Go ahead and insert the wire in all the remaining pins. Each pin that lights up the LED is considered as a column.
Final Word
Adding a keyboard library to Arduino is relatively easy. As we conclude, you should consider adhering to tips discussed in this article in order to add a keypad library to your Arduino with the utmost ease.

