
Cura offers most of the options and settings that you will find in other slicing software. If you want to print 3D objects using your 3D printer, you only need to change some speed and quality options. All the changes you’ve made are carefully laid out in Cura and ready to go. So, do you know how to connect the 3D printer to Cura? Continue reading and learn more about Cura and how you can connect your printer to the software.
What are the Functions of Cura?
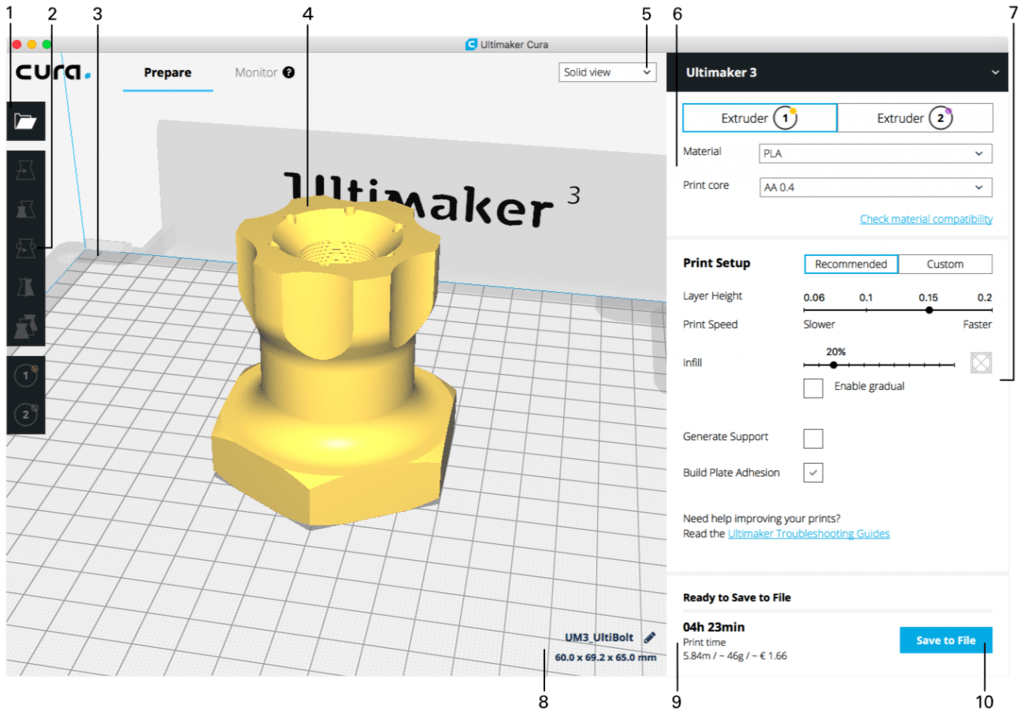
Cura is slicing software, which means that it slices 3D models and translates 3D OBJ, 3MF, or STL files into a format that a 3D printer can recognize. FFF 3D printers print the object by layers. Cura takes the model and determines how each layer is positioned on the print bed. The software also creates instructions called G-Code for the 3D printer to follow. The G-Code is a text document that tells the printer what to do.
You can make changes to this code to adjust the hot-end temperatures, fan speeds, and layer heights at various points. This is particularly beneficial when you have to troubleshoot 3D print problems. Every 3D printer has a different build plate, nozzle size, setup, and print area, so Cura should know these pieces of information in the printer profile.
Once the software has the necessary details, you can choose settings such as thickness and layer height. Cura will determine the path that the printhead should follow in order to print the 3D model and give instructions for the printer based on your settings and the printer’s vital stats. There are only a few 3D printers that are not supported by Cura, so you can find your 3D printer easily on your own.
How to Connect 3D Printer to Cura
Cura works on Windows, Linux, and Mac. In order to run Cura, your system should be Linux Ubuntu 15.04, ArchLinux, OpenSuse 13.2 or Fedora 23, Mac OSX 10.7 or Windows Vista or the newer versions of these operating systems.
If your computer doesn’t meet the newest version’s requirements, you can run older versions. You need to download Cura and install it. Check those boxes if you want to import X3D, 3MF, or OBJ models into Cura. Cura will open automatically once the installation process is complete.
When you first open Cura, you will be asked to choose a printer. Lulzbot or Ultimaker printers come with a customized version of Cura. If you don’t have such printers or you want to connect a new 3D printer to the software, just choose “Settings > Printer,” and you will see a selection of printers. If you downloaded Cura from its official website, the printers you will see are all Ultimaker.
In case you want to connect a new printer, just choose “Other” and see if your printer is listed. If it’s not listed, you should go to the official website of the website and check if there is a customized version of Cura that you can download. If there’s none, just need to choose “Custom” and click “Add Printer.” You will see the Add Printer screen and learn more about your 3D printer. Once the Cura Machine settings screen pops up, you just have to input the settings for your printer.
How to Import 3D Models to Cura
After connecting your printer to Cura, you can start importing 3D models into the software. Go to the top menu and choose “File,” then click “Open File” or click the hovering folder image on the left to import a 3D model. Cura will import the 3MF, STL or OBJ file you have selected from your computer. Just wait a bit, and you will see the 3D model on the software’s build area.
You can also change the build area’s viewpoint. Models usually look too large or too small when they appear in the build area. By changing the viewpoint, you will be able to see your 3D model from another height or angle. To change the viewpoint, you only need to right-click and scroll or drag the mouse.
If you want to zoom in or out of the model, you only need to use the middle scroll wheel of the mouse. In case you want to move the build area to another spot, you just need to hold down “Shift” then left-click the mouse. This is particularly useful if the detail you want to see can’t be seen on the screen because of the scale of the build area.
If you want to rotate around Cura’s build area, you only need to click your mouse right and hold it down. For Mac and Ubuntu users, push the left mouse button then drag it to rotate your model. This way, you can check the model from all angles.
You can view the model in three different ways. Solid, the default view of the software, allows you to see how the 3D model will look once it is printed. This view shows the shape and size related to your print platform.
The X-ray view allows you to see what should be corrected. It’s handy when a print goes wrong, and you need to view parts of the print’s internal structure.
Another view is Layers. If you want to check whether a certain part of the print is okay or failing, you can change to Layer View using the arrow keys. You can also use the slider that allows you to look through the layers that make up the print quickly. The Layer View is great for identifying layers where you need to adjust G-code settings. Cura has Tool options, which allow you to make changes to the model. If you made a mistake, you can right-click the mouse and choose “Reset.”
Conclusion
Now that you already know how to connect the 3D printer to Cura, it’s the best time to get started. Cura also allows you to print multiple models. Choose the model that you want to replicate, then right click your mouse and choose “Duplicate.”