
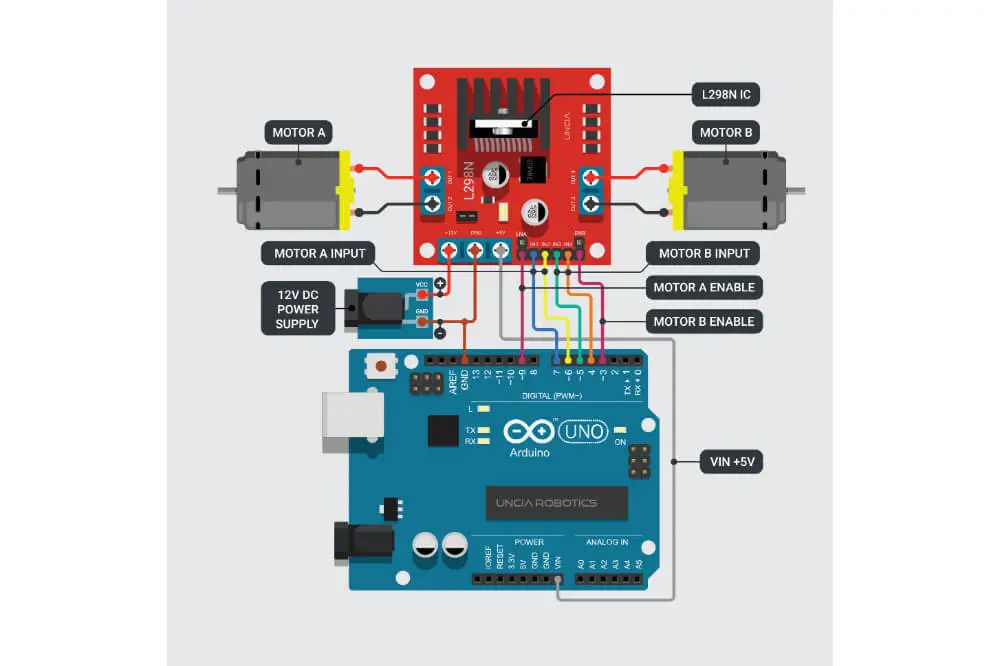
An L298n is an integrated monolithic circuit with a 15-lead Multiwatt along with powerSO20 packages. Furthermore, it features a high-volt, high-current dual full-bridge motor driver that has been designed to operate with a standard TTL logic level such as DC, solenoids as well as stepping motors.
Connecting the L298n motor driver to Arduino is relatively easy. In this article, we shall be discussing how to connect the L298n motor drive to Arduino. We shall be looking at some of the basic techniques used in controlling DC motors, and we shall be discussing this using the L298n motor driver connected to the Arduino board.
The L298n Motor Driver

As previously stated, the L298n is a motor driver equipped with a dual H-bridge that aids in allowing speed along with direct control of the two DC motors simultaneously. This module is capable of driving a DC motor that is equipped with a voltage of approximately 5 to 35 volts and a peak current of around 2 Amps.
L298n is equipped with two terminal block screws, two motors, and a different terminal block screw for a ground pin, VCC for the motor along with 5 voltage pins that can serve as an output as well as input. Usually, it relies on the amount of volts used by your motor VCC.
When your motor features a supply voltage of 12 volts, you can enable a 5 volts regulator along with a 5 volts pin as an output; for instance, when powering your Arduino board. However, when the motor features a voltage supply that is relatively higher than 12 volts, you will be forced to disconnect your jumper.
This is vital since such an amount of voltage is capable of causing damage to a 5 volts regulator onboard. In such cases, you will use a 5-volt pin as an input since you will have to connect it to your 5-volt power supply for the IC to function accordingly.
You will note that the IC helps in dropping down the voltage by approximately 2 volts. For instance, when using a power supply with 12 volts, the motor terminal will have a current of about 10 volts. Therefore, this means that you will not get the required volts to power a 12 volts DC motor.
Inputs for logic control also need to be considered. You will use two pins to enable and control your motor speed. If you have a jumper present on the enabling pin, your motor will function at its maximum speed. However, when the jumper is removed, you can connect the PWM input to the pin, and by doing so, you can control the speed of your motor.
When the pin is connected to the ground, your motor becomes disabled. The two inputs are often used in controlling the direction of your motors. By joining these pins, you will be able to control the switches of H-bridge in your L298n IC.
Connect the components! 🙂

L298n and Arduino
You can connect an L298n to a DC motor, push-button, Arduino board, and a potentiometer to control the speed of an engine. To achieve this, you will need to set pin modes along with the initial rotation direction of a motor.
You will first start by reading the value of your potentiometer then map the value you will receive, which is often 0 to 1023, to the value of 0 to 255 from your PWM signal. Once you have these readings, you will use an analogWrite function to send the PWM signal to the pin Enabled in your L298n board, allowing it to drive your motor.
Once that is set, you will have to press the button and see if it works as intended. To change the direction of your motor, you will have to inverse the two inputs. When that is done, you will push the button and see if it works; if it is working, you will be able to change the direction of your motor each time you press the button.
Controlling the L298n DC motor with Arduino
The L298n is equipped with a reliable motor driver IC. This is considered as the main part of this particular module. As discussed, the module uses the PWM method to help in controlling the DC motor.
L298n motor driver specifications
This module is designed to control the direction along with the speed of two different DC motors. When set, it will control motors that tend to operate at around 5 to 35 volts and 2 amps. In addition to that, this particular module is equipped with an onboard regulator that aids in proving an output of approximately 5 volts.
You can power this module from 5 volts to 35 volts while using an external voltage supply or Arduino. However, it is often recommended that you use an external power supply. Moreover, you can use it in controlling the stepper motor as well. Since it is relatively affordable, it is considered the best for offering robotic movements in your project.
Final Word
The L298n is a popular dual H-bridge motor driver IC and working with it is relatively easy. The module allows you to independently and easily control two different motors of each with 2 amps in each direction. The application is ideal for use in all robotic projects, and it is best for connecting microcontrollers that require a couple of control lines per motor.
To effectively connect the L298n motor driver to Arduino, you will require 2x DC motors, a breadboard, Arduino Uno, and an L298n module. With all this hardware available, programming and connecting your L298n motor driver to Arduino will be straight forward. You try and download the codebender plugin; once it is available, you will click and run the Arduino button, allowing it to program it.
You can continue playing with it by going to the Edit button and click it, allowing you to modify the code. Once you do that, you will be done, and your L298n motor driver will be successfully linked to Arduino according to your preference. We hope you have found this article helpful when it comes to connecting the L298n motor driver to Arduino.
