When most individuals hear about Joystick, they think about game controllers. When it comes to electronics, there are several useful applications of a joystick. In most cases, joysticks are used along with Arduino for DIY projects as well as robotic applications.
Furthermore, it offers an analog output, which allows it to be used in feeding analog input based on movements or controls. You might as well consider mounting it on a movable camera, allowing you to control its movement.
Connecting Joystick to an Arduino is a relatively easy task. Usually, Joysticks are equipped with two potentiometers; one is designed for vertical movement while the other one is meant for horizontal movement.
What you will be doing is adding 5-volts of power to one potentiometer and 0-volts to the remaining potentiometer. Once that is done, the wiper will adopt a value between the voltages.
Setting and controlling a joystick with an Arduino pretty much straightforward. With that said, in this article, we shall be discussing how to connect, set up as well as control a joystick with Arduino.

How to connect a joystick with an Arduino?
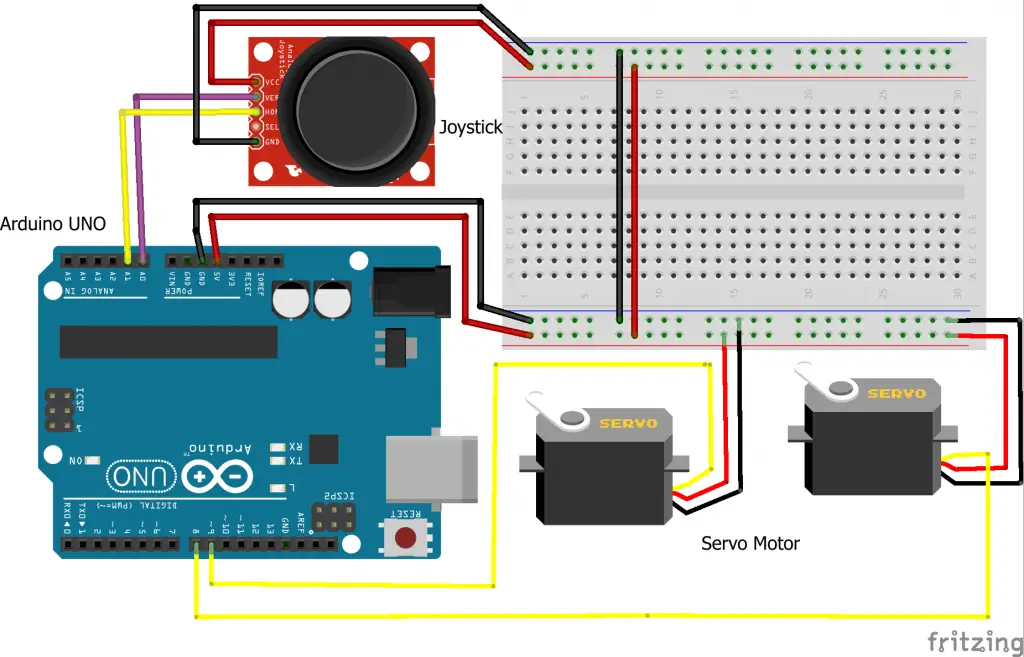
The easiest thing to do when connecting a joystick to an Arduino is working on the hardware part. Connecting your Arduino to a joystick is relatively easy, and achieving that, you will have to adhere to these essential tips:
- The first thing you will have to do is connect VCC on your Joystick module to a 5-volt pin present on your Arduino board.
- With that done, you will go ahead and connect the Ground Pin (GND) on your Joystick to a Ground Pin (GND) that is on your Arduino board.
- Once that is done, you will proceed and connect the VER pin on your joystick module to the A0 pin present on your Arduino board.
- You will then connect a HOR pin present on your joystick module to A1 on your Arduino board.
Once that is done, you will start connecting servo motors to your Arduino board. When connecting the servo motor to your Arduino board, you will have to adhere to these steps:
- Take the black wire on your servo motor and connect it to the GND pin on your Arduino board.
- You will then connect the red wire on your servo motor and connect it to a 5-volt pin on your Arduino.
- Once that is done, you will take the yellow wire on your first motor and connect it to pin 8 on your Arduino board.
- You will then take yellow wire on your second motor and connect it to pin 9 on your Arduino board.
Once that is done, you will be through with connecting your Joystick to an Arduino board.
Connect the components! 🙂

How to control a joystick with an Arduino?
Controlling a joystick with an Arduino board is an easy task. Whenever your joystick module goes in a horizontal direction or a vertical direction, you offer a value that ranges between 0 and 1023. Therefore, you might apply a condition in a code that when the value is below 300 or more than 700, then your servos will be able to move.
When moving your Joystick in a horizontal direction, your first servo will start moving to the left or right. On the other hand, when moving your Joystick in a vertical direction, your remaining servo will start moving to the left or right.
How to set up a joystick with an Arduino?
When it comes to setting up your Joystick with an Arduino can be a bit challenging for some individuals; however, when followed to the letter, you will come to find it being relatively easy. When setting up a joystick with an Arduino, it tends to involve lots of codding.
The first thing is including a library for your servo motor that will help you with making the coding process relatively easy. Once that is done, you will initialize two variables, one designed for each of your two servo motors. By doing so, it will help you use the library functions.
Once you are through, you will go ahead and initialize your pins where you had connected both horizontal and vertical pins on your joystick module as well as signal pins on your servo motors.
With that in place, you will tell your Arduino where you have connected your servo pins. You will then go ahead and move the servo motors at their initial position that is 90 degrees. Once that is done, you will go ahead and declare both horizontal and vertical pins on your Joystick as input pins.
You will read the values for both vertical and horizontal directions from your Joystick and then save the variables you will obtain at a loop function. Afterward, you will apply a condition that is when the value for a horizontal direction is below 300; your first servo will go to the right.
On the other hand, when the value for a horizontal direction is more than 700, your servo will then go to the left. This will be similar to a vertical direction of your joystick module; when a value is below 300, your second servo will be able to move to the left, and when it is more than 700, your second servo will go to the right.
Final verdict
When setting up a joystick with an Arduino, the first thing you will need to factor in is a library. This is highly essential since it allows you to calibrate your Arduino joystick, making it relatively easy to detect down, up, right, and left directions. Parameters High, Low, and Division will determine how sensitive your code is to the value from your Arduino joystick.
On the other hand, when it comes to connecting and controlling a joystick, using an Arduino board is relatively easy and does not require much explanation.
When followed to the letter, the whole process becomes relatively easy for anyone to tackle, including newbies. As we come to the conclusion, we hope that you find this article helpful and that it has helped in answering the question; how to connect, set up as well as control a joystick with Arduino.

