
Are you committed to performing soldering tasks? If so, you need to know of the various ways of how to melt solder without having to use your soldering iron. This is a vital skill you must have as sometimes you might forget your soldering iron or there’s no electricity to power your soldering iron.
Because of this, it’s vital to learn of another technique to melt solder other than when using your soldering iron. If you don’t know where to start when wanting to melt solder without a soldering iron, you’re in luck. Discussed below is how you can still melt solder even if you don’t have a soldering iron.
Steps To Follow When Melting Solder Without A Soldering Iron

Step 1: Put In Place All The Safety Measures
Melting a solder without a soldering iron usually involves using a high-temperature open flame. This can be quite dangerous, so it’s best to implement all the necessary safety measures to safeguard your wellbeing. Some of the measures to observe include:
- Ensuring the fire is always contained and keeping any flammable materials far away.
- Making sure there’s always a responsible adult around when doing this project.
- Never leave the fire unattended.
- It’s best always to wear fireproof gloves.
- Be very cautious to ensure you don’t expose yourself to fire or heated objects.
Step 2: Find A Suitable Heat Source
After implementing the safety measures, you should now go ahead and find an appropriate source of heat. There are numerous options available, so long as it’s capable of heating the metal piece to the solder’s melting temperature. This usually falls between the range of 400ºF to 700 ºF.
The options you should consider are alcohol burners, open campfires, oil lamps, butane lighters, as well as candles. If you want the best fire, using the butane lighters is, without a doubt, the best solution.
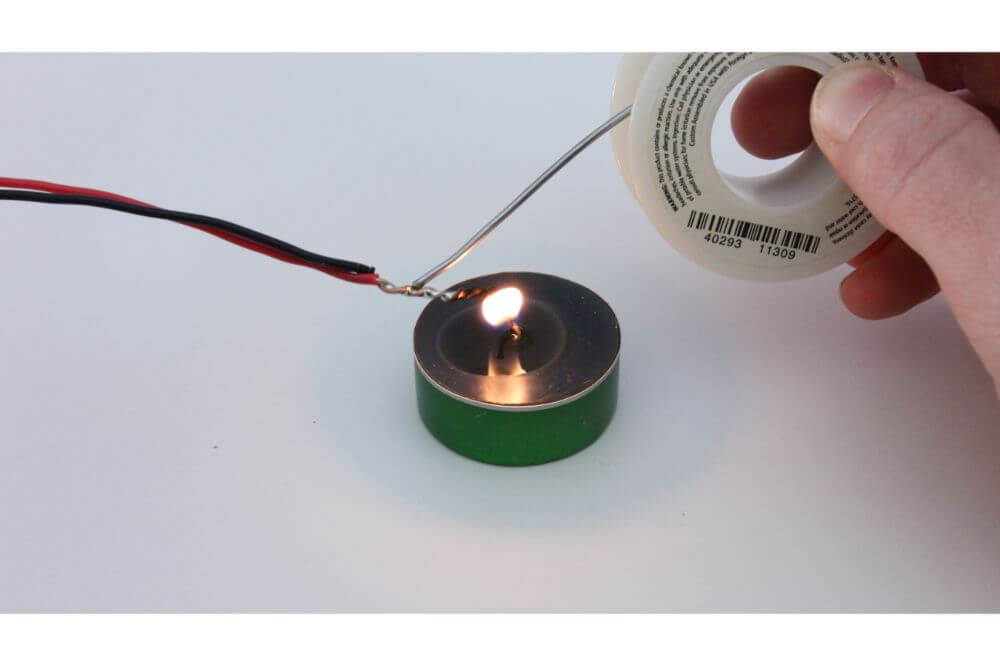
Step 3: Solder The Wires By Heating Them Directly
One of the simplest kinds of soldering you can design is by connecting two wires. You can do this by directly heating the wires, and all this doesn’t necessitate you to have a soldering iron. Consequently, get the two wires and take off the insulation from the ends, leaving each wire with around one inch of exposed metal. You should follow this up by twisting these wires together tightly.
When looking to solder these wires together, you’ll need to heat the ends of these wires, after which you can go ahead and apply the solder on the opposite side of the visible section. As you do this, make sure not to apply the solder of any of the heated areas since soot, as well as other chemical residues, might start accumulating on this section. This consequently makes it more the solder sticking properly a lot more challenging.
You should thus get your preferred heat source and position it at the wires’ end, and give the wires around 20 seconds to become hot. After this happens, start applying solder slowly to the other side of the wire’s exposed side. Heat the wire a lot more if the solder isn’t still melting, and you’ll need to remain patient. It’s important to confirm the wires are hot enough for the solder to stick properly, or else you risk getting a cold solder joint.
After forming an excellent solder joint, remove any unsoldered part of the exposed wire. By doing this, all you’ll be left with will be the soldered connection. Anytime you can achieve this, it’s recommended you insulate the connections using tape or shrink tubing.
Step 4: Find Leftover Metal To Use Like The Soldering Iron
If you’re soldering a circuit board, you should make sure never to heat it directly using an open flame. You should instead find an appropriate piece of metal, preferably steel, as it heats relatively well, it’s robust, and is readily available in many places. If you opt to use copper, you’ll need to work a lot faster since it cools off quicker than steel.
Some of the tools you’ll need when doing this include:
- Nails
- Rebar
- Bolts
- Screwdriver
- Steel wire of at least 14 gauge
- Multi-tool
A thicker object requires more heat to reach the suitable temperatures, and ideal small heat sources you can use include lighters and candles.
Step 5: Design The Suitable Heated Element
When doing this, you can use any kind of metal to be the conductor. However, it would be best to search for thin material, especially when working on tiny components and the flames are small. This is because they warm up quicker, thereby allowing you to place them in tight spaces. Furthermore, this element needs to retain adequate heat for a reasonably long duration to give you time to make at least two connections.
You should proceed by placing the solder against the area you’re looking to make the connection. After doing this, touch it using the element’s heated tip from above. Make sure to hastily create these connections before reheating the element and repeat this procedure if needed. Whereas this might be a bit tedious, you’ll be able to complete your soldering tasks.
If you want the element’s end to be easier to position and more stable, make sure to bend the element’s end to create a loop. Doing this also improves heat retention levels for a few extra seconds.
When using a large flame or a bigger connection, it’s best to avoid any small items since it makes you very near the heat source. It would be best if you opted for a thicker and longer metal screwdriver or rod using some wire. Place it such that the nail pops out from one end as well as making sure the point is facing out. Consequently, proceed to place the rod’s end and nail in flames and give it time to heat up for any duration you prefer.
Conclusion
After reading through this insightful guide, you now have an idea of how to melt solder without a soldering iron. With this knowledge and skills, you can go about with your soldering tasks regardless of the situation. This is especially useful when you find yourself in an emergency with all needed here being emergency packs, a tiny quantity of solder as well as bug-out bags.
