
Different soldering iron tips feature different styles and sizes; this often depends on your application. For instance, a small soldering iron tip will be ideal for small circuit applications. Usually, some soldering iron tips have been designed to be helpful when it comes to working with integrated circuit chips.
However, when used for an extended period, you will have to replace the iron tip. In most cases, the soldering iron tip is not interchangeable unless it is designed by the same manufacturer. Nonetheless, the process of removing the tip and replacing it is generally the same.
By understanding these vital tips, you will be able to replace the soldering iron tip in a safer way; additionally, this process is relatively easy, and it can be done by anyone irrespective of their level of skills. With that said, in this article, we shall be taking you through how to replace a soldering iron tip.
Replacing The Soldering Iron Tip Safely
As time progresses, your soldering tip might fail to solder. Usually, in this situation, your solder will be dripping off the tip, but it will not solder anything, or it might be taking too long. In most cases, this often results from incorrectly handling the soldering iron, which then prevents the tip from attaining the soldering station’s temperature.

Furthermore, the type of soldering iron tip you use will highly determine its longevity significantly. In most cases, the lead-less solder is often more critical compared to those with lead; you should always keep this in mind. Replacing a soldering iron tip is relatively easy; you will only require a soldering iron, new soldering iron tip, and small pliers whenever necessary. When replacing your soldering iron tip, you will have to follow this vital procedure:
1. Unplug your soldering iron
Ensure that your soldering iron is unplugged before replacing it. Once this is done, give it some time to cool down.
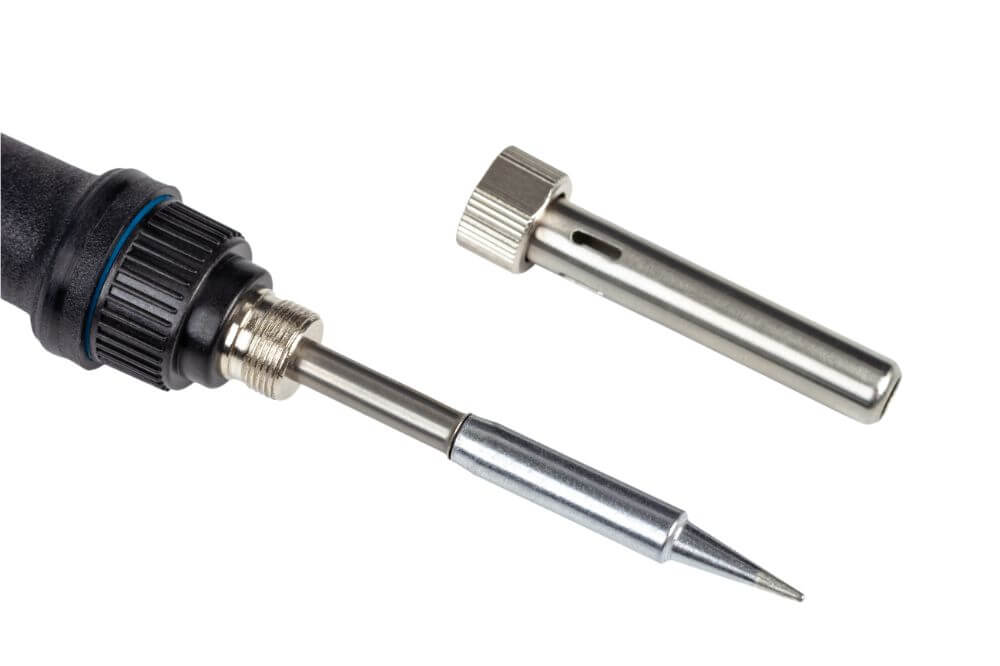
2. Locate locking nut
Once your soldering iron has cooled down all the way, you will then try and locate the locking nut. This locking nut has been designed to help the tip along with the tip-retaining sleeve into place. Once you locate, you will have to unscrew the nut. If you often use different-sized tips, you can unscrew the tip by hand. However, if it is stuck, you might consider using a small set of pliers to help in loosening it.
3. Extracting the locking nut
With the locking nut unscrewed, you will slide, then go ahead and slide the nut along with nut-retaining sleeve off your soldering iron heating element. Once this is done, you can now remove the iron tip of the sleeve.
4. Installing the new soldering iron tip
Once the locking nut has been unscrewed and you have extracted the sleeve’s tip, you can now take the new replacement soldering iron tip and then fit it in your sleeve and then slide it back on you soldering heating element just like it was before. Once this is done, you will slide in the locking nut over the tip-retaining sleeve and the tip and then tighten it by hand.
5. Do not over tighten
When screwing back the locking nut, you should avoid over-tightening it. It would be best if you always kept this in mind; it is vital since the soldering iron tend to expand and contract as it gets heated and cools. As a result, when you excessively tighten the locking nut, it will end up binding and create subsequent soldering tip change relatively challenging.
6. Maintaining the good working condition of your soldering iron tip
Once you have the new soldering iron tip installed correctly, you will want to take good care of it, allowing it to have an excellent working condition for an extended period. Furthermore, you should ensure that you are using a good quality solder; this will help in preventing impurities from accumulating on the tip.
Usually, these impurities are the ones that limit heat transfer hence making the soldering iron challenging to use. Always take care of your soldering iron tip in order to help in boosting its longevity significantly.
Tips That Will Help Boost The Longevity Of Your Soldering Iron Tip
Extending the longevity of your soldering iron tip is vital, and for you to achieve this, you will have to consider the following:
· Overheating your iron tip. It is highly recommended to have your soldering iron tip set to 100 degrees Celsius and above of the solder melting point. This tip will become oxidized once it is overheated. In most cases, the tip will turn black, and the solder will no longer be sticking; it will be dripping off.
· Turning off the soldering iron. When not soldering for approximately 3 to 5 minutes, it is best to turn off your soldering iron. This will help in protecting your soldering iron tip from oxidizing. Usually, the oxidation process gets accelerated when the temperatures are high.
· Cleaning the iron tip. It would be best if you always cleaned the iron tip after every cycle as well as prior to starting soldering. You might consider using a ball of wire wool or wet sponge. The wire wool tends to have the significant advantage of not cooling your soldering iron extremely, and you will not have to wait for your iron to attain its right temperature.
Final Note
Replacing a soldering iron tip is relatively easy; however, you will need to take extreme measures when doing so. It would be best if you always considered safety as the first priority when changing your soldering iron tip. As a result, always have it unplugged and allow it to cool completely and safe for handling before you attempt to change the tip.
In addition to that, always avoid over-tightening the locking screw since it will not leave room for the iron’s expansion and contraction. This will make working with the soldering iron tip relatively challenging. As we conclude, you should always keep in mind these safety aspects to help improve the functionality of your soldering iron tip and maintain your safety.
