
Hand saws for a long time have been an essential tool for carpenters all over the world. However, there is one main challenge that everyone still struggles with, and that is how to sharpen a hand saw, especially how to sharpen it manually. The invention of the first and most basic hand saw happened many years ago, and this tool has undergone evolution into numerous different types such as dovetail saws, carcass saws, among many others. In this article, we will take you through the step by step process you should follow to sharpen your hand saw, so that is works properly.
Steps of sharpening a hand saw
Every tool needs to be sharpened occasionally, so we will take you through the step by step process of sharpening a hand saw. If you are trying this for the very first time, you should try this out with a cheap hand saw as you perfect your sharpening skills. Here are the steps you should follow to sharpen your hand saw properly.
Check it out: 5 of the sharpest hand saws for your needs!
1. Joint the saw teeth
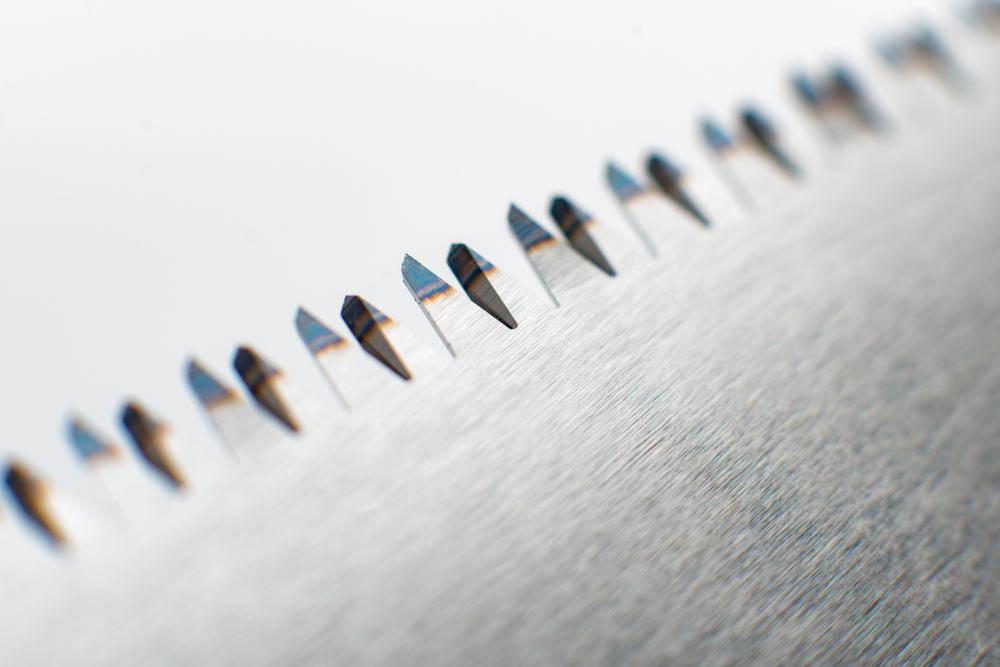
First, you need to make sure that your blade is clean. The first step of sharpening a hand saw entails leveling its teeth to an identical height as that of the holder and fil. Usually, the file jointer or holder gripping the file at a 90 degrees angle to the saw plate. Nevertheless, you can skip this first step if your hand saw has teeth that are newly punched and of similar height as well as if the saw has recently been sharpened properly.
In case you are uncertain whether the teeth are of the same height, then dust the top of the saw’s teeth lightly using a jointer and file to reveal a tiny, reflective, and shiny flat spot. Consequently, carry out one or two passes gently from its heal to toe, sticking to the teeth’ flow, and this will expose whether most of the teeth of a similar height.
However, you should not keep persisting jointing so that every single tooth is level because this might cause some teeth to chip or break off because doing so would flatten these teeth, thereby destroying most of your good teeth. Moreover, a lot of passes with the jointer will necessitate additional work to reshape the hand saw’s teeth, which is wastes your time as well as wears out your files.
2. Setting the hand saw teeth
This entails adding a minor bend to the hand saw’s teeth to ensure the saw plate does not get stuck win the kerf, which is being cut. Typically, saws that need to be used aggressively to cut should have more sets in comparison to those that used to cut more delicately. In the saw sharpening process, most individuals prefer setting the hand saw teeth later.
Nonetheless, by first setting the hand saw, you can know which tool requires filing, particularly on cross-cut teeth. Additionally, you must never set your saw’s teeth if they appear to have been set except if your hand drags at the final step. However, if your hand saw has never been set before, or you notice freshly punched teeth on it, this step is essential.
You usually only need to file the tooth’s face, which is looking away from you. Moreover, you should set your hand saw after approximately every three to six sharpening when the set becomes less broad and the teeth get worn out. Too much setting can wear off and break the teeth of the saw, and you must take extreme caution never to bend or set in the opposite direction, which has been set already as this will most probably break the teeth.
Typically, you should only set the top 2/3 of the saw tooth, and a saw set tool helps you to stick within limits. You will need to take extreme caution when setting the hand saw’s teeth without using a special tool to avoid setting the teeth excessively. Likewise, pay close attention to ensure all the other teeth you set in the opposite direction.
3. Shape the teeth of the hand saw
The shape of a hand saw’s teeth typically determines its use and performance. Additionally, there is no tooth shape, which is perfect since different jobs and different woods need different teeth shape. For instance, cross-cut tooth shape is ideal for cutting across a wood grain like a knife, whereas the rip tooth shape is best for cutting along the wood’s grain like a chisel. Reshaping your hand saw teeth is unnecessary, especially if you already have shaped the hand saw teeth, and all you need to do after is jointing it lightly and then filing for sharpness.
After deciding the fleam and rake angle you want, set the angles on your commercial file guide or block guide, and subsequently shape the teeth. To achieve extra consistency, you can opt to use the Veritas filing guide, but if the teeth of your hand saw have already been shaped to your desired angle, you can follow the existing shape. Moreover, ensure the saw’s teeth are protruding over the vise to prevent vibrations and have them to the same level as the vise plus as low as possible.
Start by filing the saw’s heal and then gradually move to the toe of the hand saw plate; hence, all your hideous looking teeth will be located on the side of the hand saw that is used least. Regardless of the duration, you have sharpened the hand saw, the final strokes always are finer to the first ones, and eventually, you will achieve a consistent muscle memory as well as rhythm.
Need Some Sharpening Tools? Check Out These Recommendations
You can opt to trace a black marker along the teeth’s top to measure how you are progressing. If you had jointed the saw’s teeth before this step, make use of shiny metal to assist you to gauge your progress. Additionally, it is recommended you use a white grease pencil or black marker to fil all the three triangular file edges.
For the first shaping, the number of strokes needed can differ. However, for the recently punched teeth, two to three strokes are enough to shape the tooth of the hand saw. Once you are done shaping the teeth, site down the saw plate’s length to conform, the teeth are not too low and are aligned. By now, the teeth should be fairly sharp, but the following steps will make them even sharper.
4. Lightly joint the saw
When sharpening a hand saw that has freshly punched teeth of identical height, you should gently dust off the teeth’s top using a file and jointer to show the tiny, shiny and reflective flat spot. Likewise, joint from the heal to toe while you follow the teeth’ flow, and this typically will be one or two light passes using a file. The shiny “flat” above every tooth will help in the step below, that is the final sharpening.
5. Final filing / Sharpening
You will now see an extremely tiny reflective flat surface above the teeth of the hand saw, and this means you should now plan to file the teeth to make them very sharp. Consequently, put a light directly above the hand saw’s teeth to allow the flats free movement as needed and have a maximum reflection.
Analyze the flat reflection and then make a decision, after which you take off half of the reflection present on this teeth’ side in case you are dealing with cross cut teeth. While filing your hand saw from the opposite side, file the reflection’s remaining half from the other part of every tooth. Furthermore, some of the teeth may need a complete stoke or two, whereas others may only necessitate a half stroke to get rid of half of the reflective flat.
The saw is sharp if the teeth gently grab your fingers whenever you rub across the tops.
6. Test Cut and Adjust
Test your hand saw by drawing a combination of try square or square in a straight line on a board and carry out a test cutting along the line. If the hand saw cuts in a cleanly and in a straight line, it is ready to be used.
Cutting Square Blocks Is Easy: Learn How Right Here
Nevertheless, in case your hand saw binds while cutting, you should add more sets to its teeth. Moreover, if it swerves in any way from the straight line, then the wandering side of the teeth has too much set. For instance, if your hand saw is wandering mostly to the right side, this means the teeth are removing too much wood on its right side hence meaning you must reduce the set slightly on the hand saw’s right side.
Place the saw plate on a flat surface and run a fine slip stone or diamond stone one or two times along the wandering edge gently. Subsequently, repeat a test cut and observe whether the hand saw is cutting in a straight line. Keep repeating this process up to the point the hand saw cuts in a straight line.
Once you confirm that the saw is neither binding on the kerf nor cutting in a straight line, you can sharpen the teeth to make them sharper. To do this, gently run the diamond slip or stone gently once along both flanks of the hand saw. Doing this eliminates any burr and follow this up with another test to gauge how it cuts.
Lastly, wipe some oil on both the hand saw’s teeth and plate to prevent corrosion as well as rust. Likewise, this maintenance practice is advisable every time you use your hand saw as well as tightening the saw nuts occasionally.
Need a Great hand saw? We Gotcha Covered
Conclusion
Having gone through this article, you now have an idea of how to sharpen a hand saw properly. Therefore, you will be able to achieve optimal results thanks to a sharp hand saw which also makes your work easier.