
In case your car is taking forever to start or has a poor ignition system, the issue is then most likely caused by the distribution cap. This is something most car owners experience as this problem is one of the leading causes of ignition problems. Typically, whenever the distributor cap is broken, it is prone to consequently causing damage to the car’s engine, thereby affecting its effectiveness.
Therefore, you should always examine the distributor cap as often as possible to avoid future damages, especially to your cars’ engine throughout the entire process while also ensuring your ignition problem is fixed correctly.
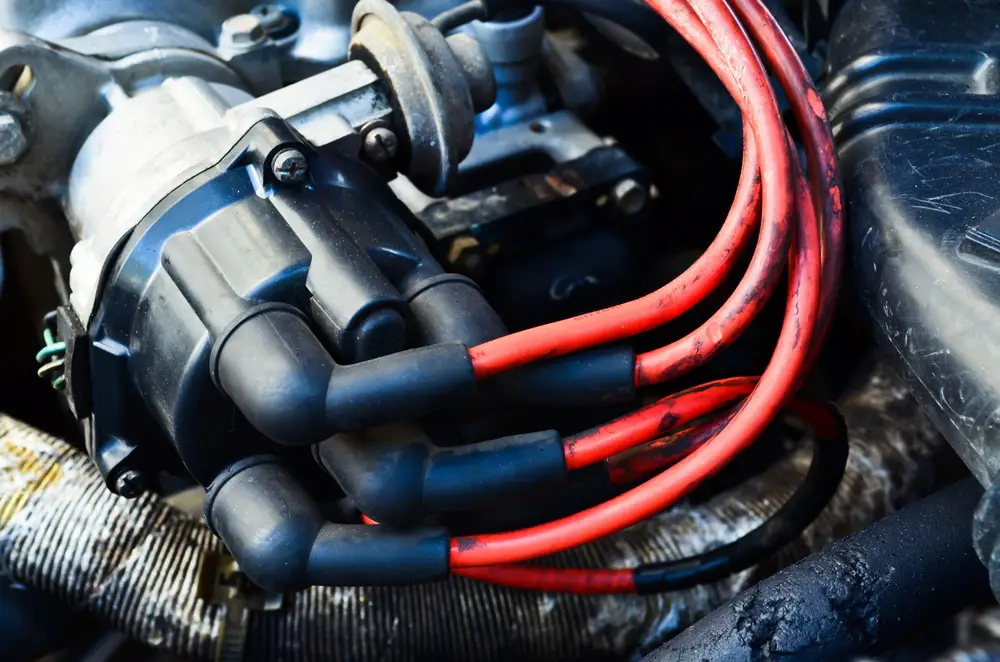
Testing for a bad distributor cap
So, how do you know that you have a damaged distributor cap? Well a faulty distributor cap usually exhibits several symptoms, such as:
- An unusual engine noise, if your engine makes irritating noise, you then need to insect the distributor to confirm whether it is faulty. In case you hear some clicking as well as tapping sound, it is a sign that your distributor cap is has stopped working.
- Your car fails to start; When the distributor cap has a problem; it will be impossible for your engine to transmit sparks that are needed to the whole circuit to enable the cylinders’ movement and put your vehicle on the motion.
- Fire breakout on your engine. This can be caused due to numerous reasons. Therefore, you have to make sure that you examine your distributor cap as often as possible to ensure that it is in a standardized status. If it has a problem, you need to have it fixed immediately to ensure it is functioning correctly.
Once you know the signs of a defective distributor cap, you can now move forward and run a test on it using a multimeter. Detailed in this article is an in-depth guide on the steps you need to follow when testing your distributor cap with a multimeter.
Step 1 – Examine the distributor cap
The distributor cap should be well examined. And when doing this, you need to inspect and make sure both the internal as well as external surfaces are clean, meaning no trace of corrosion or rust. Moreover, you also need to examine the router because, at this particular point, it is precisely where the maximum-tension spark travels to various distributor caps. Therefore, you need to do this examination thoroughly tracing for any kind of carbon traces as well as burns.
Additionally, the distributor cap might have failed to work because of a little accumulation of carbon in it, which in return conducts power that eventually affects its effectiveness. Subsequently, this interferes with the terminals resulting in electrocution of coil voltage. Therefore, make sure that you check for carbon traces in your distributor cap to avoid hazardous incidents.
Step 2 – Check the contact point
The engine might fail to function if your condenser is broken down. You are prone to experiencing electrocution if the connection of power is grounded. Note that the condenser is usually closed, so in case it is open, it means that the wire lead is in bad shape. This is likely to cause burns, which will later damage your engine.
Therefore, using your multimeter with the necessary knowledge as well as skills, make sure you examine the contact points before your cars’ engine encounters numerous problems. If the points are poorly connected, it will have timing problems; it will overrun and miss on speed hence fire breakout on your engine.
After the results are displayed on your multimeter screen, they will determine whether your distributor needs to be fixed or replaced. In case you are not sure of the details, refer to your manual script.
Step 3 – Examine the cap
Remove your wire off your distributor cap and run a test on each using a multimeter. However, with the help of a screwdriver contrary to the plug wires’ metal, place your metal screwdriver close to electrodes of your distributor cap without it coming into contact with the electrodes.
After you are done, have someone observing the arc as you ignite the engine. In case the arc is firing. Make sure you replace distributors’ electrode wires after the examination. The same applies when you are using a multimeter after the connections examine the reading values displayed on your multimeter as you also refer to your manual script.
Step 4 – Distributor cap replacement
You might find it hard replacing the distributor, but with essential skills and knowledge, this act of replacing is usually straightforward. You only need to ensure you have the required tools as well as materials in stock, such as; a point gap tool, socket wrench, screwdriver, which is flat-headed, a new tested distributor, points, and finally points.
Step 5 – Remove the old distributor
As you remove the old distributor, ensure that you compare and contrast between the new one as well as the old one just for assurance purposes. Make sure they have an equal figure of gear teeth, equal length, and above all, they are identical. In case they are not, return the distributor to the store you bought from and get the correct distributor that matches with the older one.
Step 6 – Set the point gap
By doing this, you will ensure that there is an appropriate firing gap. Point gap equipment will set for your gap exactly on your spark plug. After, the entire process puts the point in your distributor.
Step 7 – Set your distributor
Make sure you put your new distributor exactly where the older one was removed slowly and carefully till you recognize your gears coming into contact with camshaft gears. Make sure you have set the distributor appropriately in position because if it is not fixed correctly, the engine will not be able to start.
After that, when you are sure you have done everything correctly and then place the clamp back as you also replace the distributors’ cap and start the engine. If everything sounds successful, you are done with the entire process of replacing the distributor.
Conclusion
Having read through this article, you now know of the steps you need to follow when testing a distributor cap using a multimeter. Therefore, whenever you suspect that the distributor cap is faulty, do not hesitate to get your multimeter and verify whether or not it is still functional.
