
In the realm of woodworking, honing the skill of hand planing a board is a rite of passage every enthusiast or hobbyist must go through.
This art form, often passed down through generations, involves a variety of intricate steps and a deep understanding of the tool in question: the hand plane.
With components like the blade, handle, knob and mouth, every part of the hand plane holds a pivotal role in the overall process.
Furthermore, a thorough comprehension of different hand planes and their respective uses sets the foundation for superior woodworking capabilities.
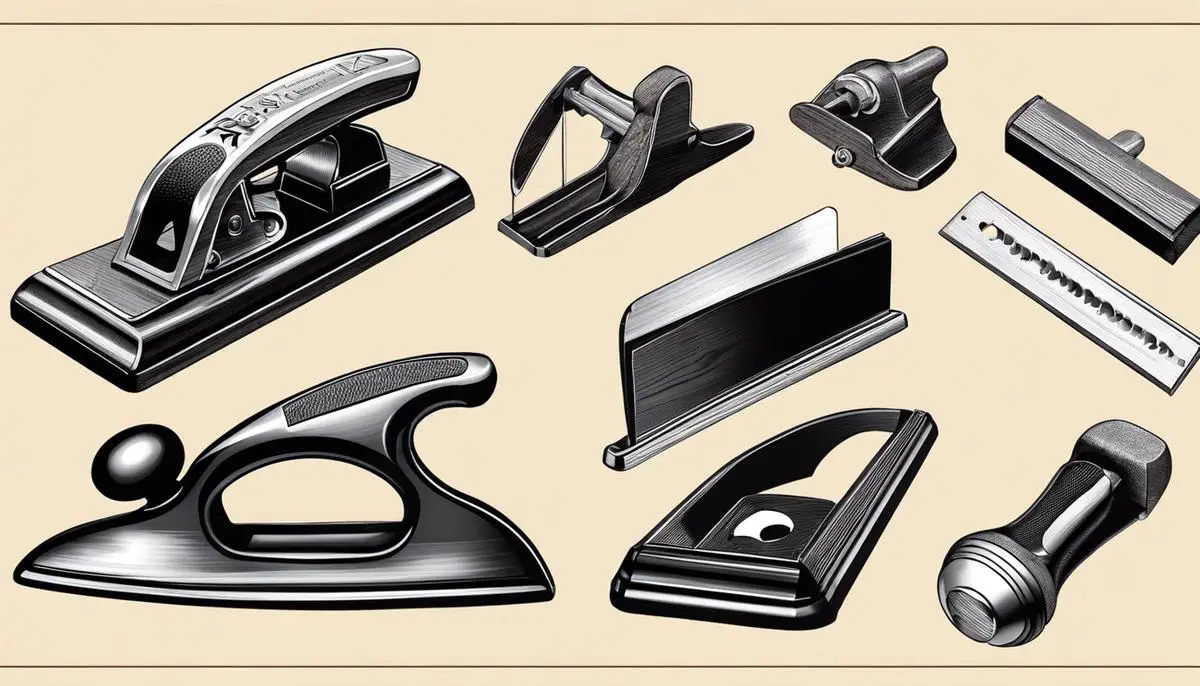
Understanding the Hand Plane
The Anatomy of a Hand Plane: Explore its Components and Their Functions
Welcome, fellow woodworking enthusiasts! For anyone who has delved into the wondrous realm of woodworking, the hand plane holds a position of unrivaled prominence.
Known for its highly practical design and versatility, this humble yet functional tool has transformed countless blocks of wood into beautiful artifacts.
So, it’s high time that we unmask this woodworking marvel and delve deep into its anatomy, learning the role each part plays in its operation.
Let’s dismantle the hand plane to reveal its individual components and their unique functions:
- The Body: This is the backbone of a hand plane, also sometimes referred to as the “stock”. It’s typically made of hard wood or cast iron, aimed to provide durability and stability. It accurately holds all parts of the plane, ensuring each component works in unison to deliver the desired output.
- The Blade or Iron: This is the superhero in the hand plane universe! The blade performs the bulk of the cutting activity. Its sharp edge skates through the wooden surface, shearing off thin slices to flatten, smooth, or shape the workpiece.
- Lever Cap: This metal piece sits perfectly on top of the blade, securing it in its place. It applies the right amount of pressure to ensure the blade stays stable during the hand planing process.
- Cap Iron or Chip breaker: Nailed to the face of the blade, the chip breaker controls the curl of the wood shaving as it moves across the blade. This helps to minimize tear-out and maintain smoother surfacing.
- Frog: The frog is more than just a sturdy base for the iron. It houses the depth adjustment knob and lateral adjustment lever, allowing the user to make fine-tuned changes to the blade’s depth and angle.
- Depth Adjustment Knob: Sitting at the rear of the frog, this knob defines how deep the blade will cut into the wood. Turn this knob to control how much material the blade removes with each pass.
- Lateral Adjustment Lever: Positioned on the frog, this lever lets the user tilt the blade from side to side. This precise control determines which part of the blade will cut deeper, and simplifies achieving accurate, symmetrical cuts.
- Handle and Knob: Both crafted for comfort and control, the handle or “tote”, and the front knob aid in directing the tool with accuracy and minimal effort. Having a secure grip makes planing a satisfying and effective process.
- Mouth: This narrow slot right in front of the blade serves an important role—it dictates the thickness of the shaving ejected. A narrow mouth delivers fine shavings, offering super-smooth finishes, while a wider mouth allows thicker shavings, great for faster material removal.
There you have it, the myriad components of a hand plane and their distinctive roles. Understanding these elements and their interplay can help in both maintaining a hand plane and mastering its use.
It will also assist in troubleshooting any issues and improving overall technique. Unquestionably, the very soul of woodworking lies in recognizing the synergistic choreography of the hand plane’s artful design. Keep honing your skills, and happy planing!

Preparation of the Board
Preparing Your Wood for the Art of Hand Planing
The fascinating world of hand planing isn’t just about identifying the lever cap, the cap iron, or the body of a hand plane.
Let’s not forget the importance of understanding the tools. It’s equally about committing yourself to the beautiful craft of preparing a board for hand planing.
Think of it closer to meditation than just another step in the woodworking process. Here’s a step-by-step guide on how to prepare a board for hand planing.
Step 1: Choose Your Board Wisely
Choosing the right board for hand planing is of paramount importance. The best way to get started is to opt for a softwood as it is user-friendly compared to hardwood.
Choose a board with straight grain and free of knots, if possible. This will ensure that the hand plane moves smoothly over the surface.
Step 2: Check the Board’s Planarity
An essential prerequisite for hand planing is making sure the board is relatively flat. Use a straight-edge or your eye to sight down the length and width of the board to identify any high spots, twists, or warping.
This will still allow for a smoother planing process and prevent any unevenness in the final result.
Step 3: Secure the Board
Safety first! Secure the board to your workbench using clamps, bench dogs, or any other holding devices.
Avoid a loose board as it may lead to unnecessary accidents, not to mention an uneven finish on your board.
Step 4: Mark Your Board
Mark the board’s surface using a pencil or chalk. As you plane and these markings disappear, you’ll know you’re getting towards a flatter surface.
Step 5: Determine the Direction of the Grain
Examining the board’s edges will allow you to identify the direction in which the wood grain runs.
Always plane with the grain – going against it can create tear-out, leaving a rough surface on your board.
Step 6: Keep the Plane Sharp
Remember, even the most meticulously prepared board will be a challenge if you have a dull blade in your hand plane. Ensure the blade is well-honed and sharp before beginning.
Getting into hand planing can be a life-changing experience – a wholesome hobby that brings not just the satisfaction of creating something, but also the peace that the process itself entails.
As you advance in your journey, remember – it’s more about the journey itself than the destination.
It’s about observing the wood, understanding the structures, and finally unveiling the magic lying dormant within the board – all with the power of your hand plane.
Because to a true hobbyist, every sliver of wood holds a story waiting to be handcrafted.
The Planing Process
Instruction Manual: The Art of Properly Using a Hand Plane
Hand planing, truly, is an art form. It takes immense skill and patience but most importantly, an understanding of the process head to toe.
We’ve already touched upon the mysteries of the hand plane’s body, its different parts and the brilliant engineering that has gone into it.
We’ve explored the fine dance that components like the blade, lever cap, chip breaker, frog, depth adjustment knob, and lateral adjustment lever perform to ensure a perfectly planed board.
Now, it’s about grasping the actual technique behind using a hand plane to bring your wooden masterpiece to life.
Step 1: Identify Your Wood for Planing
Choose wisely because your wood board is the canvas of your artwork. Hardwood makes for a challenging but satisfying experience whereas softwood boards are easier to start off with.
The aim of the game is flatness, straightness, and great grain alignment.
Step 2: Guarantee a Flat Surface
Check the planarity of your board thoroughly! Use a straightedge for accuracy. Remember, a warped board will give skewed results so meticulous checking goes a long way.
Step 3: Secure Your Board
A moving board will no doubt cause frustration and mishaps. Therefore, secure your board to your workbench using clamps for a stable work environment.
Step 4: The Mark of Planing
Marking your board’s surface with a thin layer of chalk or a pencil is a top tip. This will provide a visual cue, erased by successful planing, to determine untouched areas needing more attention.
Step 5: Follow The Grain
The direction of the grain can be your friend or foe in hand planing. Always plane with the grain, not against, to prevent tearing out chunks of your board.
This tends to reduce your workload while improving results significantly.
Step 6: Keep Your Plane’s Blade Sharp
The methods, the skills, and the know-how won’t amount to much if your hand plane’s blade is dull.
A young Bradford pear tree isn’t a match for a poorly honed blade, let alone a pecan or oak wood board. Sharpen your blade regularly to ensure clean, controlled cuts.
Remember, understanding the tools at your hand is critical to the craft of hand planing. The endeavor’s beauty lies not just in the perfectly planed wood revealing its stunning grain pattern but also in the chirping melody the plane makes as it peels off a thin shaving of wood.
The satisfaction of bringing preciseness, accuracy, and beauty to a raw piece of wood is matchless. It truly fills one with peace.
In the end, hand planing is a journey, an exercise in patience. It’s about observing the wood, understanding its grain direction, its hardness, softness and then using a hand plane to craft a piece that’s as perfect as it can be.
This journey, this pursuit of master craftsman-like perfection is what truly makes hand planing an art, a hobby to be cherished.
Once you have mastered the steps and techniques laid out above, the art of hand planing a board will become second nature.
Remember, the journey to proficiency is a challenging but rewarding one, filled with trial, error, and a multitude of hands-on experiences.
Stay patient, keep refining your understanding of the hand plane and its manipulation, and you’ll ultimately become adept at hand planing a board.
This exemplary rhythm of wood against steel, coupled with an understanding of the grain and a steadfast commitment to perfecting your craft, not only results in a smooth, flat surface but weaves you closer to the historical and age-old largeness of woodworking.
