
Embracing a hands-on approach is often fundamental in mastering any tool, and it is no different with the Apollo PEX crimping tool.
It takes a curious mind to delve into the intricate uses, adjustments, and calibrations of such a complex device.
We aim to guide enthusiasts and hobbyists through the process of familiarizing themselves with this tool, understanding its unique components, and learning how to effectively calibrate it for optimal usage.
This discourse navigates through the world of Apollo PEX crimping tool and the art of making precise adjustments when confronted with varying PEX tube sizes.
Understanding the Apollo PEX Crimping Tool
Apollo PEX Crimping Tool: A Glimpse into Components and Their Functions
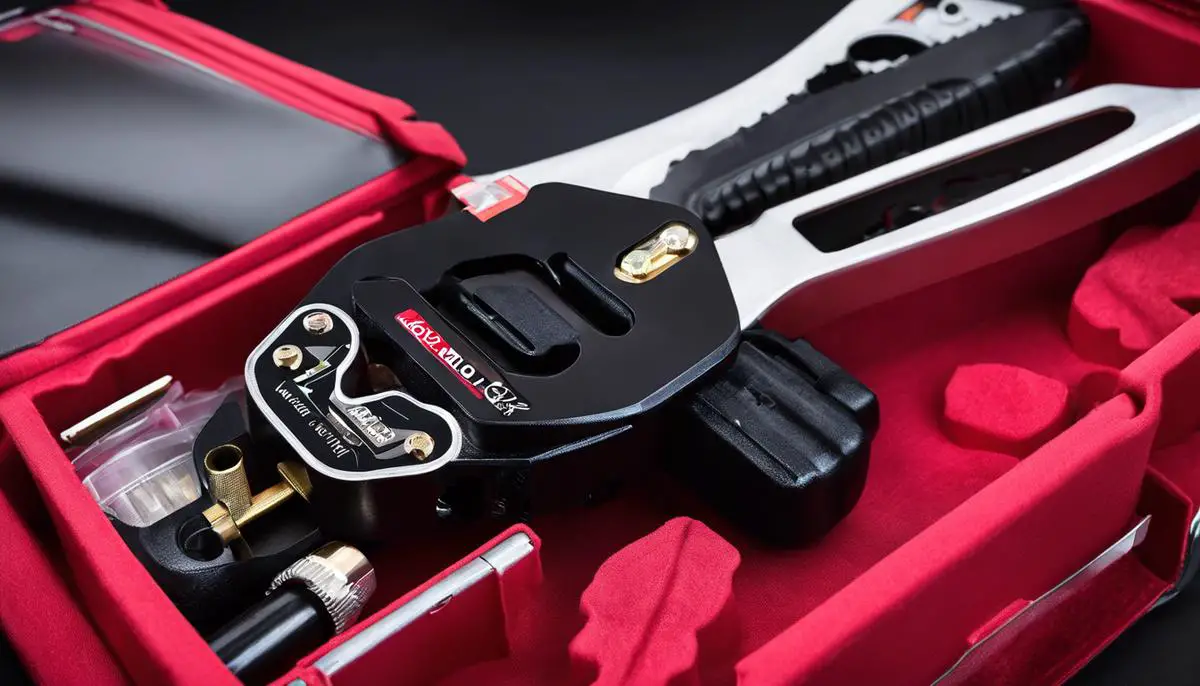
Have you ever marveled at the sheer brilliance of an Apollo PEX crimping tool? This small, yet powerful device is the unsung hero of every successful PEX plumbing project.
A preferred tool choice for DIYers and professional plumbers alike, the PEX crimping tool ensures durable, leak-proof connections between the pipes and the fittings.
Let’s unscrew the realms of this fantastic tool and delve into the components that make it tick.
First on the list is the Handle. Comprising two levers joined at one end, the handle is your source of force.
By applying pressure on the handle, you set the working mechanic of the crimping tool in motion.
The design of these handles is ergonomic, ensuring a comfortable and firm grip, so your hands don’t tire out during prolonged use.
Next up is the Head. Nestled between the handles, this is where the real action happens. The head secures the crimping ring tightly around the PEX pipe and the fitting, creating a watertight seal.
Apollo PEX crimping tools come with exchangeable heads to accommodate various crimp ring sizes.
Take a closer look, and you’ll notice the AWG Gauge. This is a GO/NO-GO gauge, a simple, but essential tool in the kit.
Once you’ve crimped a connection, you can check the crimp’s tightness using the AWG gauge. If the crimp slides into the ‘GO’ side and not into the ‘NO-GO’ side, you’ve hit the jackpot with a correctly crimped connection.
A run through the components of the Apollo PEX crimping tool would not be complete without mentioning the Adjustment Nut.
Should you find your crimps either too loose or too tight, tuning the adjustment nut will help you reach the goldilocks zone of crimping.
Another integral part of the assembly is the Pivot Pin that connects the head and handle. The pivot pin ensures smooth and efficient transmission of force from the handle to the head, making your crimping process seamless.
Lastly, let’s talk about the Spring. This small wonder returns the handle to its original position after each crimp.
Without the spring, any crimping action would be incomplete, and getting the tool ready for the next crimping cycle would be mighty tough.
From the ergonomic handle to the efficient head, the handy AWG gauge, the tunable adjustment nut, the force-transmitting pivot pin, and the spring for the reset, every component in the Apollo PEX crimping tool plays a crucial role.
Together, they form an incredible tool that turns an ordinary piece of pipe into a reliable element of your plumbing system.
Allow the understanding of these features and their functions to deepen your appreciation for your Apollo PEX crimping tool; it’s more than just a tool – it’s a craftsman’s trusty companion in creating safe, robust PEX connections.
Calibrating the Apollo PEX Crimping Tool
An Expert Guide to Precise Apollo PEX Crimping Tool Calibration
Calling all Apollo PEX crimping tool users! In your journey to perfect your plumbing skills, there arises an occasional need to calibrate your trusted companion.
This might sound daunting, but rest easy! With the right knowledge and a handful of steps, you’ll effortlessly recalibrate your tool to continue delivering excellent results.
- Collect Necessary Tools: It all starts with the right set of tools. Along with the crimping tool itself, you need an Allen wrench compatible with your adjustment nut and the Go/No-Go gauge. The gauge is pivotal as it correctly measures the crimp ring diameter.
- Understand the Crimping Process: Before diving into recalibration, first understand how the tool works. When the handles are pressurized, the head applies force to the crimp ring, securing it onto the pipe and fitting. If the ring isn’t on tight enough or is overly constricted, the piping system could potentially fail. This calls for timely calibration!
- Measure with the Go/No-Go Gauge: The initial step in calibration is testing the crimped ring using your Go/No-Go gauge. Crimp a ring onto a piece of PEX using the crimping tool. Once secured, try fitting the ‘Go’ side of the gauge over the ring. If it fits easily, then your Apollo PEX crimping tool requires calibration.
- Start Calibrating: Loosen the nut on the adjustment ring using the Allen wrench. This enables you to manipulate the tool’s crimping pressure. If the ‘Go’ side of the gauge slid on too easily, turn the adjustment nut clockwise to increase the pressure. Likewise, if the ‘No-Go’ side fit, alleviate the pressure by turning the nut counterclockwise.
- Test After Adjustments: Once you’ve made the initial adjustments, test the tool again. Replicate the process from step three. It involves re-crimping another PEX ring and using the Go/No-Go gauge to measure. Repeat these steps until neither ‘Go’ nor ‘No-Go’ sides of the gauge comfortably fit over the crimped ring.
- Tighten Everything Back: After successfully calibrating the tool, don’t forget to tighten the adjustment nut back into its place. Use your Allen wrench to secure it firmly.
Practicing Crimping Adjustments
The Importance of Trial and Error in Adjusting Your Wire Crimper
Interesting things are happening in your toolbox, crimping aficionado! Making a delicate adjustment to your wire crimper and ready to get down to business?
Well, that’s excellent! But as any seasoned wire-crimping enthusiast would tell you, adjustments aren’t just plug-and-play.
Just like a fine-tuned orchestra, the simple turn of a knob requires finessing. And, indeed, trial and error is simply a part of that symphony.
You may wonder, why is trial and error necessary? The answer lies in the idiosyncratic nature of every wire crimper tool.
Wire crimping, much like brewing the perfect cup of coffee, relies heavily on precision. Each tool, like our favorite morning beverage, requires a very specific set of conditions to perform at its best.
This need for individualized precision is exactly why trial and error is critical to the process.
Adjustment to your wire crimper isn’t merely done to change the AWG gauge size – perhaps to swap from a 14 to a 16.
Each adjustment connects a network of factors together, from the tool’s handle, head, adjustment nut, pivot pin to the spring.
However, even when one uses identical brands and models, each crimper is unique with unique calibrations.
Firstly, every adjustment needs precision calibration. This responsibility lies in your hands, technician!
Think of it as getting familiar with a musical instrument. It takes time and numerous subtle tweaks to perfect the harmony.
Every adjustment to gauge size could throw off your grip or impact how the head or the spring performs.
Even the tightness of your adjustment nut or the setting of your pivot pin could get affected. Understanding these relationships and the role each plays in the perfect crimp is key here.
Secondly, the material properties of each wire play a part. A highly malleable wire might need less force than a harder wire of the same gauge size.
Different insulation types can also require different amounts of crimping force. Even environmental factors like temperature and humidity can influence your crimping process.
All these variables make the adjustment of your wire crimper less of a science and more of an art that requires constant refining.
Last but not least, no matter how tech-savvy one might be, no automatic tool can substitute the human touch.
It’s your dedication and unwavering attention to detail that delivers perfection in every crimp. The joy of cultivating an intimate understanding of your tool, without relying solely on the Go/No-Go gauge, is incredibly rewarding.
Remember, fellow crimping compatriots, while trial and error might be tedious, it’s the pathway to crimping greatness.
Adjusting your tool isn’t solely about twisting a knob but uncovering new layers of understanding. And in the world of wire crimping, there’s always room for improvement.
Remember, no adjustment is final until your able hands decide so! The quest for perfecting that artful crimp goes on.
So, keep exploring, keep adjusting, and most importantly, never stop crimping!
Mastering the use of Apollo PEX crimping tool is a continuous learning journey. It’s about consciously understanding every single part of the tool, correctly calibrating it, and making the right adjustments when working with various sizes of PEX tubes.
With these steps in mind, adapting to different circumstances becomes inherently simpler. Although it might appear intricate at the outset, with repeated practice, the process will become second nature.
Furthermore, impeccably crimped PEX tubes will serve as a testament to the skills acquired, substantiating the effort put into learning and honing this craft.
