There are three types of Arduino available in the market; choosing one that will best suit your needs is vital.
Connecting each of these Arduino boards to a solar will feature some slight differences. This is because each Arduino board is equipped with unique attributes that make it different from the other. In this article, we shall be discussing how to connect the solar panel to Arduino.
Types of Arduino
Before going through with how to connect your solar panel to Arduino, we shall first go through the types of Arduino boards. These types of Arduino boards include:
Arduino Uno
The Arduino Uno is equipped with the following features:
- Operating voltage of 5 Volts DC
- Microcontroller ATmega328P and family microcontroller of 8-bit AVR
- 6 analog inputs
- 7 to 12 volts DC input voltage
- The digital I/O; 14 and 6 PWM
- 2KB SRAM
- 1KB EEPROM
- 32K Flash
- 16 MHz clock speed
- A USB connection
- Idle power 50 mA
- It measures 2.7 inches by 2.1 inch
The Arduino Nano
The second Arduino board is the Arduino Nano, and it is equipped with the following features:
- Operating voltage of 5 volts DC
- Microcontroller ATmega328P and family microcontroller of 8-bit AVR
- 8 analog inputs
- 7 to 12 volts DC input voltage
- The digital I/O; 22 and 6 PWM
- 2KB SRAM
- 1KB EEPROM
- 32K Flash
- 16 MHz clock speed
- A USB connection
- Idle power 19mA
- Measures 1.7 inch by 7.3 inch
The Arduino Pro-Mini
This is the third type of Arduino board, and it is equipped with the following features:
- Operating voltage of 3.3 volts DC
- Microcontrollers ATmega328p and family microprocessor of 8-bit AVR
- 6 analog inputs
- 3.3 to 12 volts DC input voltage
- Digital I/O 14 and 6 PWM
- 2kb SRAM
- 1kb EEPROM
- 32k Flash
- 8MHz clock speed
- Idle power 4.7mA
- Measures 7 inch by 1.3 inch
As you can see, all of the above Arduino boards are equipped with the same microcontrollers. In addition to that, they are equipped with nearly the same number of digital ports, analog ports, memory configuration as well as PWM ports. However, the main significant variation is the power requirements, clock speed, and measurements of the Arduino boards.
Usually, the main reason for designing a device that runs on solar energy is to help in reducing power consumption. With the attributes along with the objectives previously discussed, you can now compare and select the type of Arduino board that will best suit your needs from the three designs.
The Arduino Uno uses approximately 50 mA, which is 3.5 times more than what Arduino Nano needs at 19mA. On the other hand, Arduino Pro-Mini features 4.7 mA, which is 11 times less compared to Arduino Uno. When you compare these three designs, you will come to see that Pro-Mini is by far the smallest and relatively less expensive.

The Arduino Pro-Mini board clock speed
In addition to power consumption, the Pro-Mini board features an incredible clock speed. Its slow clock speed accounts for a decrease in power consumption. This feature may or may not be ideal for use, depending on the application. When working on a solar project that requires extra clock speed, Arduino Nano will be best for use.
Preserving charge
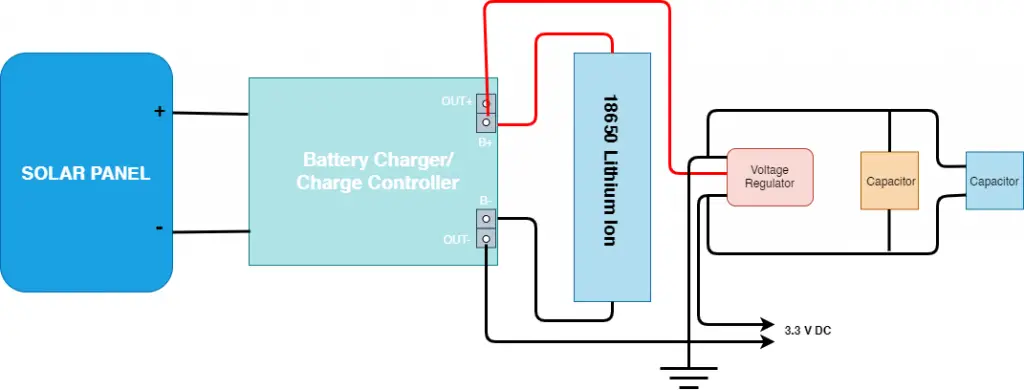
You will require a battery to act as a charge reservoir. There are different types and sizes of rechargeable batteries that are designed to run Arduino Pro-Mini. A 3.7-volt lithium-ion battery is considered the best.
Connecting solar panel to Arduino
It would be best if you considered having a solar module with a charger for Li-ion batteries along with a DC to DC converter that will supply up to 5 volts. In addition to that, the SquidBee mote is required, and it is equipped with three inputs. You will need a couple of pin connectors that are VCC and GND for cells with more than 6 volts and mini USB connector and additional pin connectors for approximately 6 volts.
You will connect the last two connectors to your battery charger, with the first one going through voltage regulators that are equipped with a limited output to help in protecting the charger against damage due to excess voltage.
When it comes to connecting your solar panel with Arduino, you will use two wires, with one being 5 volts while the other one is GND. The solar module for Arduino, you will have to connect these cables to the output connectors; in your Arduino, you will use the 5 volts along with the GND pins.
Connect the components! 🙂

An Arduino board equipped with a battery charger.
An Arduino board fitted with a Li-ion battery is considered the best for use when connecting your Arduino to a solar panel. Such feature, you will be able to power your Arduino project with utmost ease using two different ways that are:
- Connecting the Arduino board to a module
- Connecting Arduino board to solar panel
You can as well consider connecting the Lithium-ion battery to the solar module and then join your solar module to the Arduino board using a 5-volt wire. This makes the whole process relatively easy and allows you to charge the Lithium-ion battery using the power from your solar panel.
Final Thoughts
When connecting your solar panel to Arduino, you should always look for an Arduino board that will best suit your needs. In addition to that, the types of solar panel you will use tend to have a significant impact as well. This means that you need to choose the right solar panel for your Arduino project.
Since your solar panel will be the primary source of power energy, you will need to choose one that will offer an ample supply of electricity to run your project with the utmost ease. As we come into conclusion, we hope that this article has been of great benefit when it comes to understanding how to connect a solar panel to Arduino. By adhering to these tips, you will be able to connect it without undergoing issues.

