
A sensor is a gadget that converts a physical quantity such as vibration, humidity, light, heartbeat, temperature, to mention a few, to an electrical quantity.
If you wish to develop a personalized code that processes them as well as easily read sensor values, connecting an Arduino board is necessary. But before going any further, how do you interface a sensor using Arduino?
This is a question many persons ask themselves to ensure they get the best possible reading. In addition to this, connecting the Arduino to the internet allows you to measure the different elements regardless of your location.
Consequently, you can share this information with your friends. If you don’t know where to start when interfacing a sensor with Arduino, here’s an in-depth guide on all the steps that must be followed.
What’s An Arduino Sensor?
Before you learn how to interface sensors with Arduino, you first need to know what’s an Arduino sensor. This is a vital question to ask yourself, especially after Arduino global popularity has soared both among designers, artists, hobbyists as well as students across the globe.
Arduino features a software IDE and microcontroller that uploads a code into a hardware board. Many sensors were developed after the demand for Arduino among hobbyists increased. The sensors integrated into Arduino are useful in designing new applications and improving the interaction with your surroundings.
The various types of sensors you can use your Arduino sensors include:
- Vibration sensor
- Position sensor
- Sound sensor
- Electrical fields sensor
- Pressure sensor
- Humidity sensor
- Temperature sensor
- Light sensor
- Magnetic fields sensor
- Motion sensor
- Gravity sensor
- Moisture sensor
These different kinds of sensors are used in various industries from aerospace, manufacturing, medicine, machinery, robotics, as well as automobiles.
Working Principle Of Arduino
Before Arduino’s launch, the microcontrollers used before didn’t have a software IDE that could be used to upload code into hardware. Due to this, you had to use a separate gadget when uploading code into hardware. This ideal flexibility feature allowed for the easy interfacing of sensors with Arduino.
Because the microcontroller already offers a software IDE needed for programming, the only other hardware needed for interfacing these sensors to the Arduino are connection wires plus Breadboard.
Subsequently, you can proceed by writing the code in Arduino IDE and later uploading it. All you need for successful interfacing of the sensor with the Arduino are connecting wires, breadboard, ground, and power supply.
How To Interface An Ultrasonic Sensor With Arduino
Now that you know that Arduino can be used on different types of sensors, in this illustration, we’ll take you through how to interface it with an Ultrasonic sensor. Ultrasonic sensors are gadgets that calculate the distance between objects through sound waves.
These sensors usually work by transmitting sound waves at ultrasonic frequency and, consequently, waiting when it bounces back from an object. The delay between the sound transmission and when the sound is received is used in calculating the distance.
The formula used to do this calculation is Distance= (Speed of sound * Time delay)/2
When doing this computation, make sure to divide it by two since the sound waves make a round trip, that is, from the ultrasonic sensor to the object and then back to the sensor. Therefore, this means the distance covered is double.
There are different projects where you can use an ultrasonic sensor, including electronic distance measurement tapes as well as obstacle detectors. Here’s an outline of the steps of how to interface an ultrasonic sensor with Arduino.
Step 1: Get The Needed Components
For interfacing the ultrasonic sensor with the Arduino to determine the distance on a serial motor, you require:
- Breadboard
- Arduino Uno
- Jumper wires
- PC or laptop
- HC-SR04 Module
Step 2: Know More About The HC-SR04
HC-SR04 is an economical ultrasonic ranging module sensor that offers 2cm to 400cm of non-contact measurement functionality that has a range accuracy that can attain up to 3mm. Integrated into all HC-SR04 modules is a control circuit, a receiver, as well as an ultrasonic transmitter.
The four pins found on the HC-SRo4 are:
- TRIG (Trigger)
- GND (Ground)
- ECHO (Receive)
- VCC (5V supply)
The main features you need to be on the know are:
- It has a measuring angle of 15 degrees.
- The operating voltage is 5V DC.
- Ranging distance varies between 2cm to 4m.
- The operating current is 15mA.
Step 3: Incorporate The Arduino Serial Monitor
The Serial Monitor uses a concept of Serial Communication and is a component of the Arduino IDE. You can also find it in the Web IDE, and this enables the transmission of data from the connected board through USB.
When you type into a window at the top and subsequently click “Send” or “Enter,” it sends the commands with the data on the board shown underneath that. This is possibly one of the most vital tools in an IDE and is necessary when providing inputs to the board or debugging code. You better understand using it after trying several complicated projects which take inputs and offer subsequent outputs.
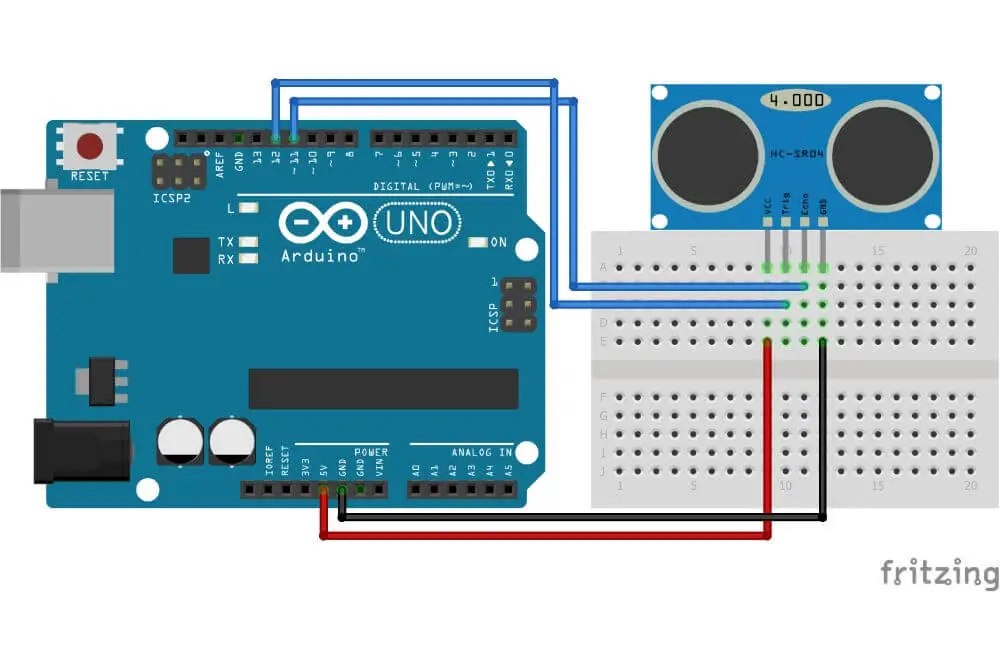
Step 4: The Circuit
You now need to make the right connections to ensure the sensor interface with your Arduino is appropriately done. These connections are made by:
- Connecting the Trig to Digital Pin 9.
- Placing GND to the Arduino’s GND Pin.
- Attaching Echo to the Digital Pin 10.
- Connecting VCC to the Arduino’s 5V pin.
When placing these connections, there are a couple of things you need to remember, including:
- It’s possible to connect the Arduino to the Ultrasonic sensor directly using a jumper.
- Don’t place the sensor on a metal surface to prevent a possible short circuit that might destroy the sensor.
- It’s advised to place an electrical tape right behind the sensor’s back.
Connect the Components! 🙂

Step 5: The Code
This entails inputting the code needed for completing the successful interacting of the sensor with Arduino.
Step 6: Uploading And Testing
Once the code is set up, upload the code by connecting the Arduino to the computer. After this code gets uploaded successfully, data transmission to your computer will start. You’ll get to identify this by seeing a blinking Tx LED on the Arduino as data is being transmitted. Consequently, you’ll be able to measure the distance between the object and your sensor.

Conclusion
Interfacing a sensor with Arduino is useful in measuring different things. If you didn’t know how this gets done, reading this insightful article must have offered you valuable tips on how this can be done. Now that you know this feel free to go straight ahead and interface a sensor with Arduino without any issue.
