For any computer system to work effectively, it must keep up with many variables, and one of them is time. Time is essential in running several operations, including updates and execution of certain orders, and must be set correctly to work with certain software and applications.
Most computer systems and electronic gadgets have the real time clock (RTC) to track the current time. There are several real time clock units, with some working perfectly with certain systems. For example, Arduino’s platform will work excellently with the RTC DS3231.
A Look at the RTC DS3231
The DS3231 is a budget and extremely accurate RTC that features a temperature-regulated crystal oscillator and a crystal, which improves its overall efficiency. One of this clock system’s key features is to keep accurate time even when there are power interruptions on the main device. It manages this feat courtesy of its battery input.
This RTC’s accuracy comes through its crystal resonator. It maintains all the time values from seconds, minutes, hours, days, and months, with automatic adjustment at the end of the month for months with less than 31 days.
With the DS3231, you may pick either the 24-hour or 12-hour clock system, depending on your preference. There are also two alarms provided to boost its usability.
Use with Arduino
The RTC DS3231 is the best choice for the Arduino platform and plays a role in various Arduino-based applications such as telematics, power meters, GPS, and many more. Like Arduino, the DS3231 is also a low-cost system and suitable for a budget project, mostly the DIY ones.
If you are into such projects, you need to know how to set time in RTC DS3231 Arduino, which is vital to start you off. Let us have a look at how to perform this function.

Setting the Time On RTC DS3231
Here are some of the components you need to set time on this RTC:
- The DS3231
- An Arduino board
- A rechargeable coin cell battery
- Four male to female jumper cables
Step 1: Connecting the RTC to the Arduino Board
For the first step, you connect the RTC to the Arduino board. It is a delicate step that needs some keenness; otherwise, it may fail to function. Fix the coin cell battery to the real time clock, where the positive side faces upwards, most of the time.
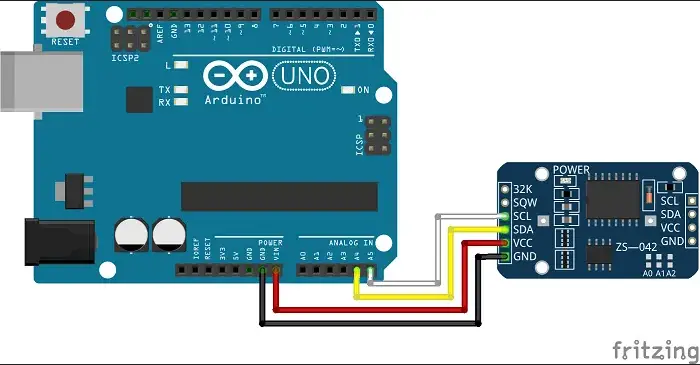
Using the male to female jumper cables connect the four sets of pins. Follow this order; VCC to Arduino 5V, SDA to Arduino A4, GND to Arduino GND, and SCL to Arduino A5.
Connect the components! 🙂

Step 2: Downloading and Installing a Library
The second step is very lengthy, though pulling it is a straightforward process and involves downloading and installing the DS3231 library. The library is a collection of codes that allows you to connect and integrate secondary components to the Arduino board. You can get the RTC DS3231 library online then proceed to install it.
There are two ways to install the library, either through the library manager or manually.
Installing Libraries via The Library Manager
To use the library manager, launch the IDE, then click on the sketch menu. From the sketch menu, click on include library, followed by manage library. The library manager opens, and you will see all the installed libraries and those ready for installation.
Click on the downloaded DS3231 file that you downloaded and click on the preferred version, then click on install and wait for the IDE to complete this action. If you have fast internet speeds, the installation will complete in seconds. Once done with the action, an ‘installed’ tag will show next to the DS3231 library.
Manual Installation
You can also manually install the libraries on your computer. You first download the library as a ZIP file and store it appropriately on your storage. You now go to the sketchbook folder, accessible by clicking on file, preferences, and then sketchbook location.
Follow by going to the directory where you downloaded the ZIP file. Extract the contents of the ZIP file and store it in a temporary folder. Select the main folder with the library name and copy the contents inside the sketchbook.
Verify that if the process was successful by going to sketch, including libraries, the folder should be present. Now the file is ready for use in the Arduino sketch library.
Step 3: Connect Arduino to Your Computer
Back to setting your time, you connect Arduino to your computer. Initiate the integrated development environment then open the SetTime sketch, accessible from file, then examples, DS3231RTC, then SetTime. Download the sketch to Arduino.
Step 4: Confirmation
You now confirm that you have set your time successfully. You do this by opening the serial window and ensure that the baud rate is at 9600. If all is good, you will see a success message. You are now good to go with your projects as your time is accurate.
For efficiency purposes, when setting your time, you should pay attention to the connections. This is the wiring part, where you can use a wiring diagram to guide you on the right links. The diagram comes in handy if you are a beginner. You can also use a breadboard, as most of the time, it has labels to guide you on the connections to make.
Benefits of the RTC DS3231
- It is highly accurate and shows you key time values: minutes, seconds, hours, day, and month.
- Features a digital temp sensor.
- The simple serial interface design allows it to connect to most microcontrollers.
- The battery input allows it to keep accurate time even when there are power interruptions on the main device.
- It is low-cost and easy to link to the Arduino board.
Conclusion
Time is an essential variable in computers and the real time clock comes in to ensure the accuracy of the devices’ time. The RTC DS3231 is an ideal clock component of the Arduino platform and is compatible with the system due to its simplicity.
Highlighted is how to set time in RTC DS3231 Arduino. Follow the steps keenly for the module to work accurately.


