
Soldering copper pipes is a skill that many enthusiasts or hobbyists desire to master. But even more important is understanding how to unsolder these pipes, particularly when alterations or repairs become necessary. This essay aims to equip you with essential knowledge and strategies, beginning with your safety – a critical aspect we’ll delve into by discussing proper equipment and safety precautions.
We’ll then take a detailed look at the different types of joints you’ll encounter and the specific techniques each of them require for successful unsoldering. Finally, we’ll walk you through the unsoldering process itself, ensuring you understand how to handle commonly used tools and how to properly apply heat.
Prepare to become well-versed in procedure, safety, and tool utilization, unlocking the ability to tackle copper piping projects with confidence and efficiency.
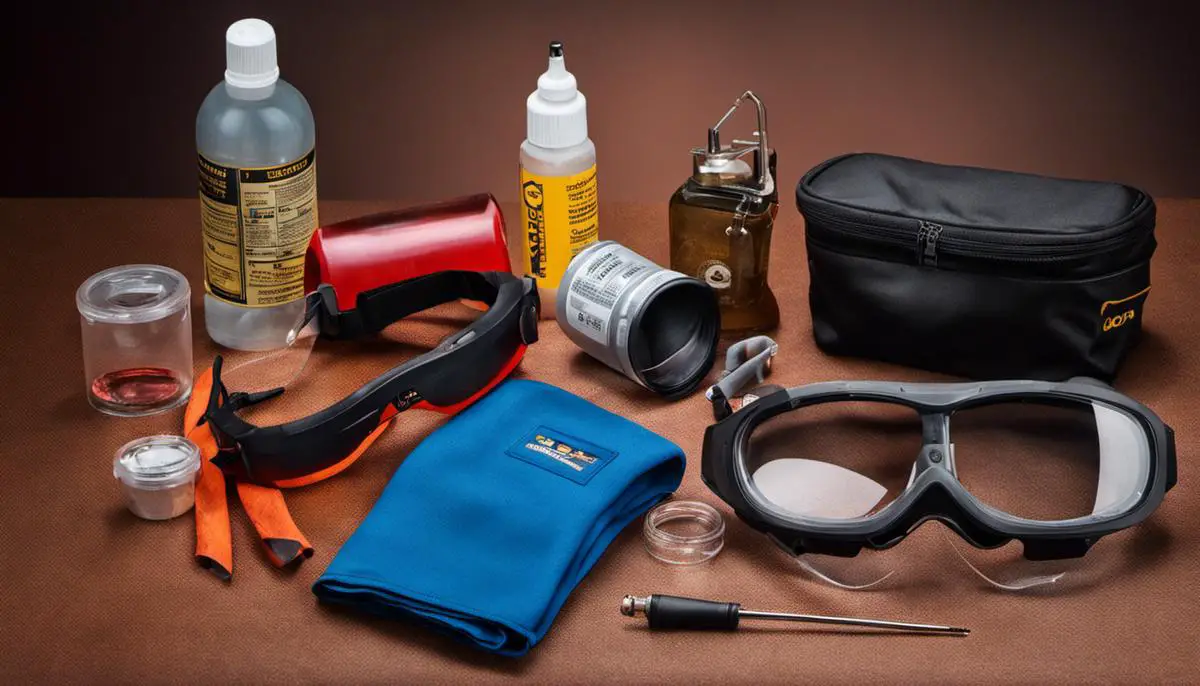
Safety Precautions while Unsoldering
Safety Precautions for Unsoldering Copper Pipes: A Comprehensive Guide
Adventuring into the DIY world of plumbing isn’t something that happens overnight! Just like any hobby, it’s a gradual process of skill building, turning every experience into a wealth of information.
And as true devotees to plumbing know, working with copper pipes, especially unsoldering them, demands precision and caution. Here are some essential safety precautions every hobbyist should practice while unsoldering copper pipes.
Wear your protective gear:
An essential rule of the trade is that personal protection comes first. In this task, it translates to donning sturdy gloves with heat resistance.
Why? Soldering and unsoldering copper pipes involve high temperatures, and you wouldn’t want a sudden heat surge giving your fingers a nasty shock. Along with gloves, safety glasses are also non-negotiable. The eyes are sensitive and should always be shielded from flying sparks or debris.
Work in a well-ventilated space:
Soldering tasks can release fumes that are rather unwelcome to the respiratory system. A well-ventilated area helps disperse these fumes, allowing you to work more comfortably.
If you’re working indoors, simply opening windows or doors should suffice. An exhaust fan or respirator mask takes the safety quotient up a notch, especially when dealing with older pipes which may have lead-based solder.
Watch your torch:
Always remember that a torch in the wrong place can cause irreparable damage. Ensure the flame is pointed safely away from yourself and any combustible materials. Additionally, never leave the lit torch unattended.
Use a heat shield:
A heat shield is handy when unsoldering pipes near combustible materials, such as wall studs or insulation. It’s a sheet made from a non-flammable material like galvanized steel or copper, commonly available in home improvement stores. This shield provides an effective barrier against potential fire outbreaks, significantly reducing the risk of collateral damage.
Cool before you touch:
After unsoldering, give the pipe sufficient time to cool down before handling it. Remember, copper retains heat rather well, and a hurried move can result in a nasty burn. Employ a set of pliers or channel locks if you need to maneuver the pipe while it’s still hot.
Unsoldering copper pipes may come with its challenges, but with the right safety precautions, it becomes less daunting and more enjoyable.
Just as a seasoned sailor navigates rough seas with skill and caution, a well-versed plumbing hobbyist tackles complex tasks such as unsoldering with the right blend of knowledge and safety. So, suit up, stay safe, and plumb on!

Photo by sparkledump on Unsplash
Recognizing Different Types of Joints
Mastering the Art of Identifying and Handling Copper Pipe Joints
Every dedicated plumbing enthusiast knows that copper pipes are like the veins of any healthy plumbing system. These copper conduits facilitate the unfaltering flow of water throughout our homes.
Like any system, however, it’s made up of various unique parts. Each of these requires keen observation, comprehensive understanding, and masterful handling.
Sitting comfortably at the heart of these intricacies are the joints that hold the system together. Equipped with the knowledge we’ve accumulated, let’s delve into the identification and management of different types of joints in copper pipes.
First, let’s identify the kinds of joints you’ll encounter. Copper pipe joints come in two primary types: sweat joints and compression joints. Sweat joints get their name because they require heating the copper pipe to form the joint successfully.
To identify them, look for a pipe that fits into a fitting, sealed with a ring of solder around it. The appearance resembles sweat – hence, the name. Meanwhile, compression joints are called as such because they are tightened or ‘compressed’ onto the copper pipe. Recognize them by a coupling housing a rubber ring and a tightening mechanism.
After identifying sweat joints, the next stage is addressing them. To establish whether a sweat joint is well-formed, examine the ring of solder. A clean, neat ring indicates a correctly formed joint, while blobs or rough patches suggest potentially faulty joint formation.
The procedure for repairing sweat joints involves delicately applying heat with your trusted torch (remember those earlier safety lessons). The goal is to heat the joint until the solder melts. Then, remove the heated pipe and scrape away the old solder.
After prepping the pipe end with flux, you’ll reassemble the joint and apply fresh solder. Completing this technique should yield a visually seamless sweat joint to be proud of.
Handling compression joints, compared to sweat joints, involves less heat and more physical force. To check the condition of a compression joint, use a wrench to unscrew the coupling. If you find the rubber ring inside deformed or worn down, it’s time for a replacement.
To repair faulty compression joints, initially remove the joint entirely from the pipe section. Replace the impaired rubber ring with a new one – remember to choose a high-quality ring, as it’s the barrier against leaks. Once that’s handled, reattach the coupling, tightening it securely onto the pipe.
Understanding, identifying, and managing the joints in your copper piping can feel like a daunting task. Still, as abundantly clear hobbyist plumbers, we love a good challenge, especially when it makes us masters of our craft. In Sanitation Symphony, every skill we acquire and each problem we solve adds a note to our tune, helping us create a plumbing masterpiece.
Now, armed with this knowledge, it’s time to become the conductor of your own copper pipe orchestra. Dive in, explore, and remember, in the world of DIY plumbing, understanding the joints is like having the key to the city. Happy pipe working!

Unsoldering Process
Now that we’ve got the safety procedures and the basics of copper pipe joints under our belts, it’s time to delve into the art of unsoldering. This seemingly challenging process can be made simple with a step-by-step approach and your patient application of skill and technique. So here we go!
First, locate the sweat joint you’ll be working on. Remember, these are the joints with an even, silver ring around the connection. Want to become a true plumbing maestro? Start by always inspecting the joint before beginning. Turn off any water supply flowing through the pipe to prevent any unexpected fountains.
Our unsoldering journey begins by applying heat to the sweat joint. But hold your horses, don’t aim the torch flame directly onto the soldered joint! We need a gentle and evenly distributed heat to get the solder flowing and prevent any damage to the pipe. Pass the torch flame around the joint, focusing more on the fitting than the pipe.
While you’re doing this, you would want to have a pair of groove-joint pliers ready. Why? Aha, because as soon as the solder starts melting, you’ll need to twist the joint gently using the pliers to detach the pipe fitting.
But wait, you might be thinking, what if the joint doesn’t seem to budge? Well, don’t sweat it! Just repeat the heating process a bit longer, but remember, patience is key. After all, Rome wasn’t built in a day and perfection in unsoldering won’t be either.
Once you’ve separated the component from the pipe, let’s get one thing clear. We don’t want any solder remnants getting in the way of our future work! Always follow through by cleaning the detached components. Use a fitting brush or a small piece of emery cloth to brush off any leftover solder. Be gentle, we’re not trying to scuff-up or reshape the fitting.
Then, move onto the pipe. This time, utilize a plumbing reamer to remove excess solder. The goal is to avoid creating bumps or notches that may hinder a smooth re-soldering process.
Finally, wipe clean both the fitting and the pipe with a soft, damp cloth. Make sure it’s free from any debris before you proceed to re-soldering or storing them.
Remember, every pipe you unsolder gleams with the mark of your hard work and dedication. Enjoy cosplaying as a plumbing superhero, discovering the realms of uncapped potential, and sailing in the sea of your newfound skills.
Keep learning, keep improving, and whether it’s in unsoldering or in life, persistence is key. Now, you are all set and ready to take on the plumbing mysteries that await you. Good luck!

After immersing yourself in this rich compilation of knowledge, understanding how to unsolder copper pipes should now be within your grasp. You’ve learned the importance of being well-equipped with proper safety equipment and following recommended precautions to prevent accidents.
You’ve distinguished between various joint types and grasped the distinctive methods for unsoldering each of them. Moreover, you’ve navigated the intricate unsoldering process, gaining an understanding of the critical role heat and specific tools play.
So, as your further refine these skills, remember that safety is paramount, familiarity with different joint types is essential, and mastering the unsoldering process is your key to success. Armed with this knowledge, you are well-positioned to tackle any copper piping project that requires unsoldering with competence and precision.
