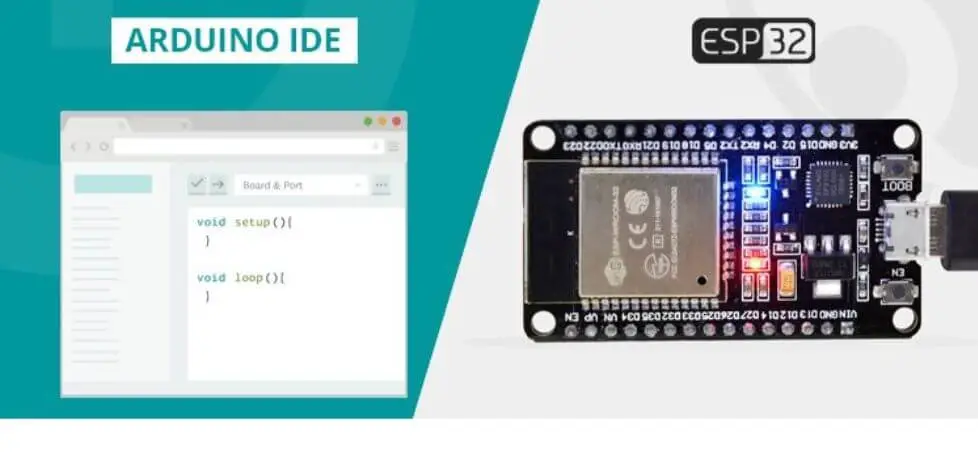
The ESP32 is a series of microcontroller chips manufactured by Espressif Systems in Shanghai. With this programmable, which incorporates Bluetooth 4.0 and WIFI Support, you can observe and see things from anywhere across the globe.
With that said, you can also use this microcontroller alongside the Arduino IDE. This is relatively straightforward and shouldn’t have any concerns since it isn’t as hard as you might think.
If you still have doubts about whether this is the case, you’ve come to the right place. This article is an in-depth guide on the steps to follow when using the ESP32 with Arduino IDE. This is something that the experts in Espressif have made a priority to simplify.

Steps To Follow When Using ESP32 With Arduino IDE
You’ll need to follow each of these steps one by one to guarantee the correct use of the ESP32 with the Arduino IDE. Here’s an overview of the steps you need to take.
Step 1:
The steps you need after installing the ESP32 boards onto the Arduino IDE are:
- Confirm your Arduino IDE version is 1.8 or higher and if it isn’t, make sure to update it. Once you’re done, go ahead and open it.
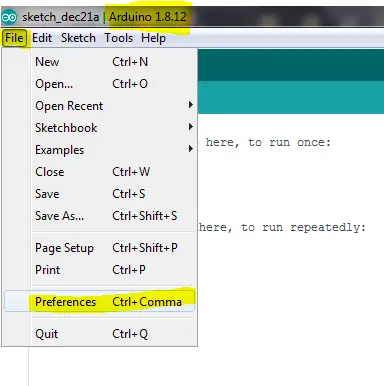
- Click on File showing at the top bar menu.
- Click the menu item Preferences to open the Preferences dialogue box.
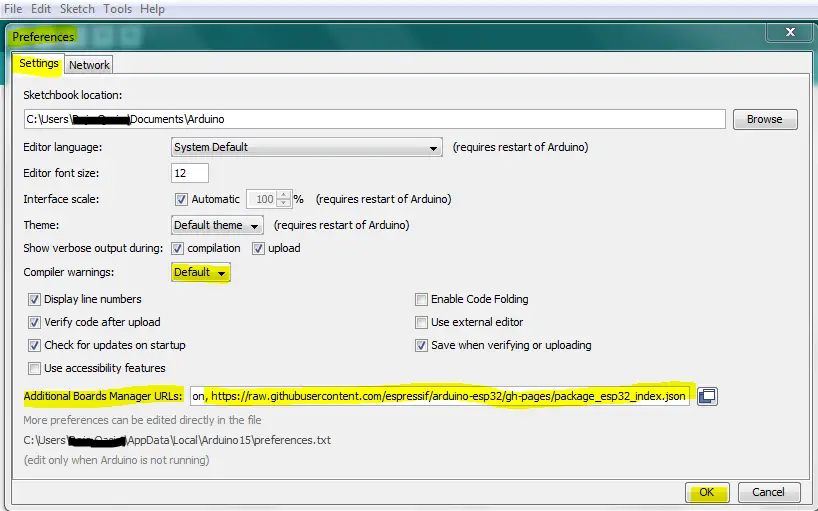
- Make sure to set the default on the Settings tab showing on the Preferences dialog.
- Search for textbox labeled “Additional Boards Manager URLs.” If you see a text in the box, include a coma at the end.
- Paste this link https://raw.githubusercontent.com/espressif/arduino-esp32/gh-pages/package_esp32_index.json into the text box.
- Save these settings by clicking on the OK button.
Step 2:
This step entails you using the new entry to add an ESP032 board to the Arduino IDE. The procedure to follow when doing this is:
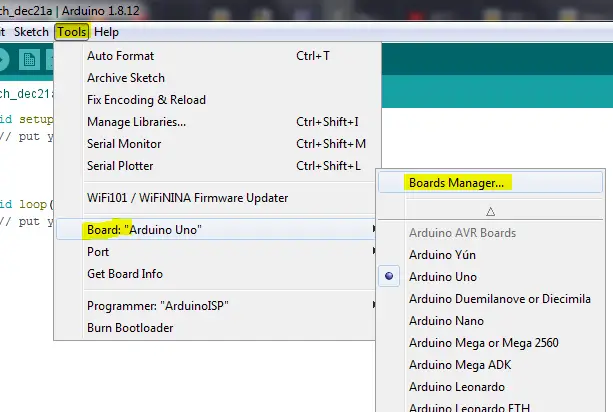
- In the Arduino IDE, go the Tool menu found on above the menu bar.
- Scroll down until toy see Board:
- After highlighting Board, you’ll see a submenu open.
- Head to the submenu and click on the Board Manager to open the board manager’s dialog box.
- Enter esp 32 in the Boards’ search box.
- After doing this, you’ll see esp32 by Espressif Systems show up and highlight the entry and consequently press the Install button.

- By doing all this, the ESP32 boards will be installed in the Arduino IDE.
Once you’re done, head over to the Boards submenu, and the number of ESP32 boards will appear. Subsequently, choose the board which matches the ESP32 board, which you’ve just bought.
After doing all this, you’re done with installing the Arduino IDE, not unless you’re hoping to install some extra Python files. The best way to know whether this is really necessary is by compiling and uploading a program on the EPS32 board. Consequently, inspect if any error shows up, and if none does, you’re good to go.
Step 3:
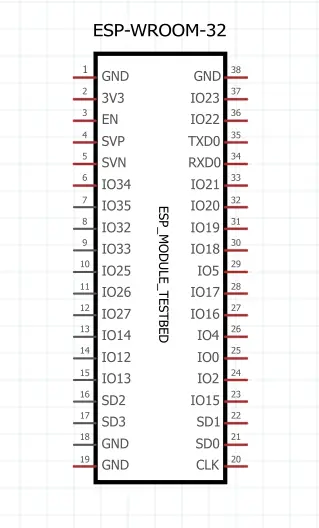
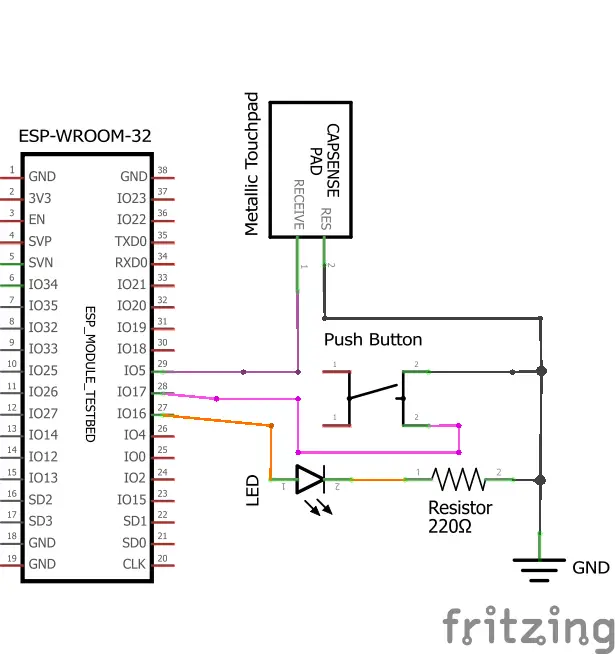
You’re required to hookup the ESP32 board before uploading a test program. As you do this, please take note that ESP32 pins aren’t specified by their pin numbers but instead by their GPIO names. The reason for this is different ESP32 boards have varied pin numbers.
When doing this, you can opt to use any LED with the dropping resistor any value between 150 to 470 ohms works perfectly well. Furthermore, having a momentary-contact push will be helpful.
If you see any tiny gold square, this is the Touchpad. You should then get a metallic object which can connect the wire to the small PCB piece, which works excellently. The bare wire doesn’t need to be as big as a small wire will be enough. When everything’s in place, feel free to test out the program.
Step 4:
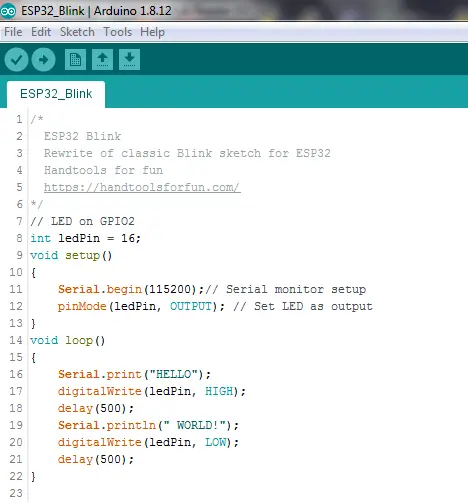
You should now use new development programming or development for a new gadget hence why it’s needed to design the “Hello World” program. The “Hello World” program is the Blink Sketch, which flashes an LED on and off. Although the “Hello World” sketches and programs are no practical use, they do perform numerous functions, including:
- They help you confirm the hardware is functioning properly.
- The familiarize you with the programming syntax. If you’re using C++, which is used by Arduino, then you most likely are familiar with this programming syntax.
- It helps you familiarize yourself with the functioning of the library development. For this specific case, it allows you to exercise the uploading of programs of the ESP32 that operate somewhat different to Arduino.
Step 5:
This entails uploading the program once you’re through loading the sketch onto the Arduino IDE. After doing this, the sketch should be complied with and later shifted to an ESP32 board. All you need to do with Arduino is pressing the Uploadbutton, and these steps will be carried out automatically. However, you’ll need one more step with ESP32.
Subsequently, press the Uploadbutton, and this will initiate the complier to start working. By now, you must have noticed the composition of ESP32 programs takes relatively long compared to the time it takes for Arduino sketches.
While doing all this, closely inspect the screen status at the Arduino IDE’s bottom side. Once the compiling process is over, you’ll see “Connecting” and a string of periods after that. If this does pop up, you should press the BOOTbutton and hold it down until the upload progress shows up. You’ll know this is happening if an upload progress image gets displayed, and this shows as a percentage.

Consequently, once the program gets uploaded, hit the RESET or ENABLE button to initiate its start. If everything goes according to plan, a flashing LED light will appear.
Conclusion
Learning to fix ESP32 with Arduino 32 is often viewed to be complicated. If you were of a similar opinion, this shouldn’t be the case after reading this detailed article on the steps to follow. With this in mind, you should now feel confident enough to use ESP32 with Arduino IDE to carry out whichever task you’re doing.

