
Short to the ground is an electrical problem which is often prevalent in automotive. Whenever you experience short to ground, this indicates that a live wire is coming into contact with something that it should be in contact with hence it becomes grounded accidentally. When this occurs in an electrical appliance at home, it will end up tripping the breaker, and you will not be able to reset it unless you fix the problem.
In practical terms, this means that you are experiencing a leak within your electrical circuit somewhere. Checking for short to ground within your house or automotive is very critical. Therefore, in this article, we shall be focusing on how to check short to ground with a multimeter.
Checking for short to ground with a multimeter
When it comes to automotive diagnostics, checking for short to ground is one of the most common tests carried out. Luckily, this test has been made easier with the use of a digital multimeter.
There are numerous designs of multimeters that are designed to help solve this issue, especially within automotive. As long as you have a multimeter capable of measuring Ohms, then it will be perfect for carrying out this test. Here are essential steps you should consider following when checking for short to ground with a multimeter;
Assess appliances
This is the first thing you should do. Ensure that every light, plug and devices aren’t working accordingly due to short to ground. The last electrical device you were using could be the likely culprit that led to the short.
Unplug it from the AC outlet and test both flat prongs using a multimeter to check whether it is shorted. If it isn’t, assess the same circuit for any appliance such as a toaster or a heater that might be drawing a lot of energy. Ensure the devices you are testing were recently used and could be the ultimate cause of short to ground.
If none of the appliances has been short, then the breaker will trip itself off whenever excess capacity of energy is being withdrawn. To ensure that this is the cause, unplug everything on the circuit and then turn the breaker on.
If the breaker trips once again while there is nothing on the circuit, then the main problem lies inside the walls. However, when a fuse blows or the breaker keeps tripping, it could be as a result of a faulty breaker. Replacing it with a new one will be highly necessary.
Isolate the breaker
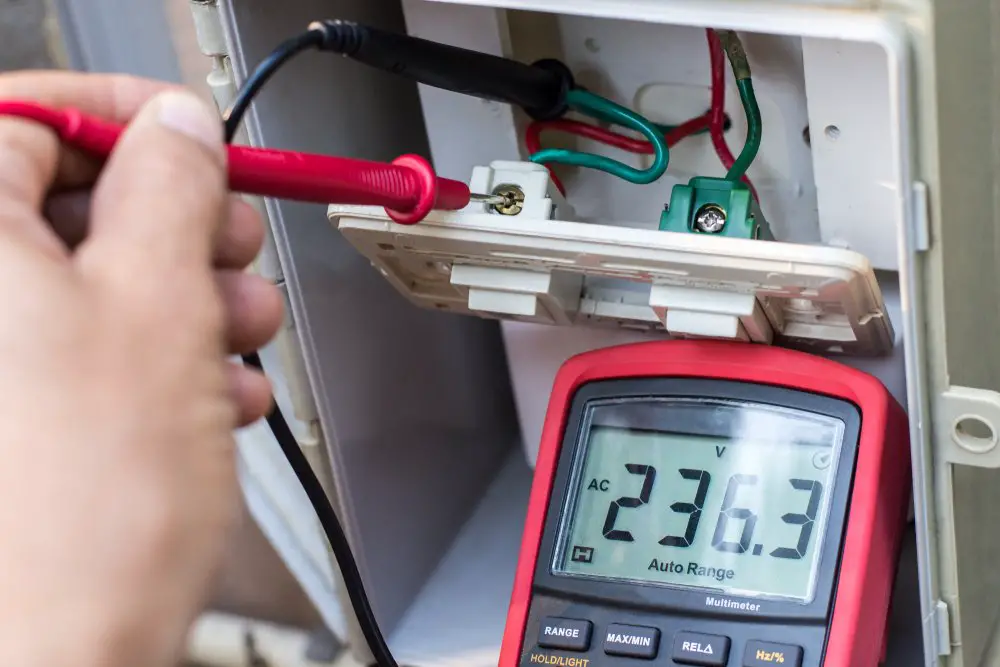
Ensure that there is no working electrical circuit before you commence on the test. Turn off the breaker to avoid any accidents from occurring. Check for zero volts by inserting your multimeter’s probes into the problem receptacle.
If there is any presence of voltage, you should look for the right breaker and repeat the same process. Once you are sure the power is off, take off the wall plate and then pull out the switch, wall plug or a light socket in order to expose the wire.
Assess all terminal boxes
Set your multimeter to Ohms while the power breaker is still off. Assess for short with the wires by placing one lead of your multimeter to a black wire and the other lead to a white wire.
If your meter displays an infinite O.L or Ohms, then the circuit and the receptacle are in good condition. This means that the power breaker could have tripped due to a lower current flow. Therefore, in such situations, you will require an electrician who will have to access the main panel and have it replaced.
On the other hand, if your multimeter displays continuity, this indicates a short to ground within the circuit which could be as a result of a faulty breaker, broken wire or switch. From the terminal, remove the black wire in order to isolate it from the receptacle and then carry out the same continuity test in between the white and the black wire.
Check all the wires and cables and ensure there are no signs of cuts or wear, which shows bare copper that is capable of coming into contact with something else, causing short to ground. If everything is good condition, screw the black wire to its original terminal and then reinstall the box using wall plate.
Once this is done, go to the next electrical box as well as the circuit and repeat the same test hence eliminating every wall plug, light socket and switch from the faulty list. If there is not any problem after testing every terminal box, then the power breaker is probably faulty.
Vital aspects you should consider when checking out for short to ground
When checking for short to ground, here are some key elements you should always consider;
- Have the right tools for carrying out the test.
- When using a digital multimeter, test it to ensure it is in good condition before commencing on the test.
- Using a screwdriver, open your multimeter and check for any presence of brown liquid or gaps. If present, you should consider looking for a different multimeter to help you with the test.
- When you receive a multimeter that is in good condition, set it to continuity mode to test for short to ground within a circuit.
- Ensure that the power outlet has been turned off
- Take off the faceplate of an outlet
- Get rid of attachment of wires within the old outlet
- Attach wires to your new outlet
- Screw the new outlet back into place
Conclusion
By now, we hope that you can check for short to ground with a multimeter. You should then put your knowledge into a test. You should always remember that, if you are not experiencing a short to ground problem on the circuit or component you were testing, you will have to measure something different apart from infinite resistance.
You should always ensure that the power breaker is off before commencing on the test. As we come into a conclusion, we hope that you will be able to locate and rectify any power problem associated with short to ground.
